CYBR8470
This repo contains a digitized version of the course content for CYBR8470 Secure Web App Development at the University of Nebraska at Omaha.
Building a Server
Introduction
In this module, you will learn how to build a server of your own and connect it up to IFTTT (a web automation toolkit mostly used for the Internet of Things).
Goals
By the end of this tutorial, you will be able to:
- Build and deploy a
Djangoserver into acontainer - Create a
REST endpointon theapplication server - Build a simple web service integration
Materials Required
For this lesson, you will need:
- PC or Mac with Docker
- Internet connection
- An IFTTT account (if you want to connect your server up)
Table of Contents
- Building a Server
- Step 1: Review - Where are we so far?
- Step 2: No, you won’t be starting from scratch
- Step 3: Setup the server
- Step 4: Run the server
- Step 5: Building the server event API endpoint
- Step 6: Press the button
- Step 7: Chrome Dev Tools - Your new best friend
- Step 8: Make a new REST endpoint to make the client button work with the backend
- Step 9: Profit!
- License
Step 1: Review - Where are we so far?
We saw how containers could be used to host isolated servers on another host machine.
Now, in this lesson, we will examine how to create our own server and deploy it in a container.
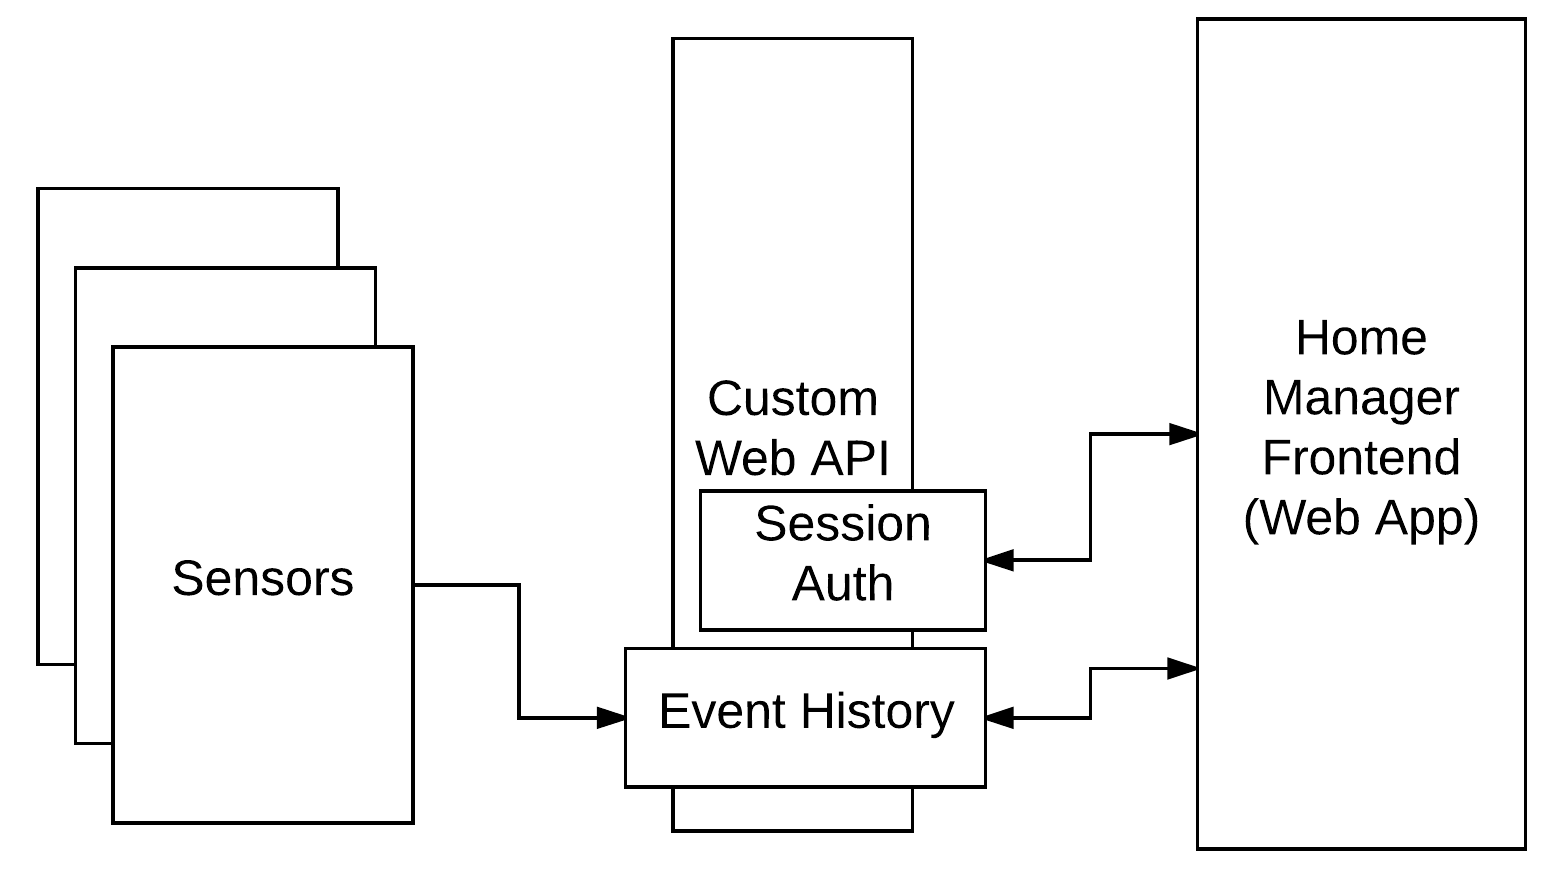
For reference, this is the overall design we are looking at. On the left side, you have some sensors - they could be anything, since this isn’t an IoT class, we can just assume we are getting data from them. In this lesson, we will begin building the item marked custom web API in the figure below. It will have features to support authentication, logging events, and we can even include a hook to trigger another service (like IFTTT).
Step 2: No, you won’t be starting from scratch
The process of creating a new application server from the ground up takes some time and attention. Instead of having you start from the ground up, I’ll provide you with some starter skeleton code. This code does the basics - you will extend it to accepting requests, store the data that comes in, and then trigger another service.
- First,
forkthe repo for this lab by visiting the https://github.com/MLHale/cybr8470-web-service-lab and clicking ‘fork’. This will copy the code from our repository into your GitHub account - so you can track your changes as you go. - Let’s get started locally on your machine by changing into the Desktop directory and then using
gitto clone the skeleton code repository and get it in onto our local machine.
Open a new terminal instance:
cd Desktop
git clone https://github.com/<your-github-id without the brackets>/cybr8470-web-service-lab
cd cybr8470-web-service-lab/
Now use docker to build the image that our container will use, from the cybr8470-web-service-lab directory:
docker compose build
With this, we should be able to type the following and see our new image.
docker images
It will be called something like cybr8470-web-service-lab-backend_django.
Step 3: Setup the server
This server is completely new, so we need to do some setup to get it initially configured. Execute the following to run the server and open up a bash terminal to interact with it.
docker compose up
This will initialize the server and tell our Django server to setup the database. It will create a database Schema that our SQL server can use to store data.
in a separate terminal:
docker compose exec django bash
In this terminal that opens in the container, we will use the manage utility to create new superuser account. Specify a password for admin. In development, you can use something simple (e.g. admin1234) for simplicity. In practice, you would want to use a much more secure password - since the server could be accessed from the wider internet.
python manage.py createsuperuser --username admin --email admin
exit
- Now open your source code editor
- Find your
cybr8470-web-service-labfolder - Upon opening it you should see the file tree of the folder structure.
Step 4: Run the server
Although our server is already running, any time you want to stop it you can press Control + C. To bring it back up just type:
docker compose up
This server, diagrammatically looks like:

The docker command executes the container using the docker-compose.yml file located in your /cybr8470-web-service-lab/ folder.
- Leave this terminal running
- It works by mapping
port 80on thehosttoport 8000in the container. - Inside the container, Django executes using a wsgi wrapper utility gunicorn - which works like a web server.
- There is also a second container that starts up and runs our
postgresdatabase server. - a third container map django out of its application container into a webserver called nginx
- You can take a look at the
Dockerfilein your/cybr8470-web-service-lab/folder to learn more about what happens behind the scenes.
With the server running, you should be able to visit http://localhost to see your server.
This is a web client (also called a frontend) that I’ve built for demo purposes to work with our server. You will be making the server work with the client. I’ve included the client code in the /frontend folder, but you won’t need to modify it for this lab. Later labs will deal with client-side development.
Step 5: Building the server event API endpoint
Since our focus is the backend - lets take a look at our server environment. This is built with Python 2.7 and is intentionally using an old version of Django (the reasons will become clear in the next lab). First, Lets explore the file tree.
- click
backendin the file tree to explore the actual files our server is using - Click
apianddjango_backendto expand out the folders and see what we have. - This code is built using a
Model View Controllerframework calledDjango.Models(inmodels.py) areabstractionmechanisms that help you represent your data without worrying about the nitty gritty of database technologies.Controllers(incontrollers.py) andViewsare modularization mechanisms that separate user-facing code (like user interfaces) from backend code that handles number crunching and getting data to the views.
- Look over these three files, first
models.py, thenurls.py, thencontrollers.py
Models.py
- In
models.pyyou will see that we have defined twomodels:EventandApiKey. Both of these areschemathat have fields in them for each of the types of data they hold. - In our
ApiKeymodel we have fields for theownerand the actualkey. These will hold our IFTTT key that we will use later to communicate with IFTTT viawebhooks. - We have also provided an
Adminclass that lists out the fields. This is used by Django’s admin interface to display the data for management.
class ApiKey(models.Model):
    owner = models.CharField(max_length=1000, blank=False)
    key = models.CharField(max_length=5000, blank=False)

    def __str__(self):
        return str(self.owner) + str(self.key)

class ApiKeyAdmin(admin.ModelAdmin):
    list_display = ('owner','key')
- In the
Eventmodel we have fields for:- the
eventtypewhich describes what occurred, timestamp(when it happened)useridwhich is the id of the user- and
requestorwhich logs the IP of the client that sent the message
- the
class Event(models.Model):
    eventtype = models.CharField(max_length=1000, blank=False)
    timestamp = models.DateTimeField()
    userid = models.CharField(max_length=1000, blank=True)
    requestor = models.GenericIPAddressField(blank=False)

    def __str__(self):
        return str(self.eventtype)

class EventAdmin(admin.ModelAdmin):
    list_display = ('eventtype', 'timestamp')
- Both of the models also include a
__str__function which outputs a string if the model is converted to a string.
urls.py
Next lets look at urls.py. This file tells Django which URLs are accessible on the server. If a URL entry isn’t included in a urls.py file, then the method cannot be accessed.
- The important part of this file, below, identifies all of the
url patternsthat are acceptable forDjangoto server up to any would-be requestors - Each is a regular expression.
- Each maps to a function in the
controllers.pyfile. Basically, when someone attempts to visit a URL, Django goes through its list of acceptable patterns. If it matches a pattern it executes the corresponding code in that method. If it doesn’t match any acceptable pattern, it gives the user anHTTP 404error (not found). - in this case,
api/urls.pyis a sub set of patterns that are mapped behind/api/as given in the filedjango_backend/urls.py.
api/urls.py
urlpatterns = [
    url(r'^session', csrf_exempt(controllers.Session.as_view())),
    url(r'^register', csrf_exempt(controllers.Register.as_view())),
    url(r'^', include(router.urls)),
]
django_backend/urls.py
urlpatterns = [
    url(r'^admin/', admin.site.urls),
    url(r'^api-auth/', include('rest_framework.urls', namespace='rest_framework')),
    url(r'^api/', include(api_urls)),
    url(r'^xss-example/', controllers.xss_example),
    url(r'^', controllers.home),
]
Controllers.py
Next, lets look at the controllers.py file to see what the server does when a URL is visited.
There is some code in this file that handles session-based authentication and registration, but we need to create more code to make this app work.
Specifically the client is trying to retrieve events, so it can display them accordingly in the app. We need an API endpoint that handles requests to the /api/events URL.
Inspect the network console to see the requests the client is making.
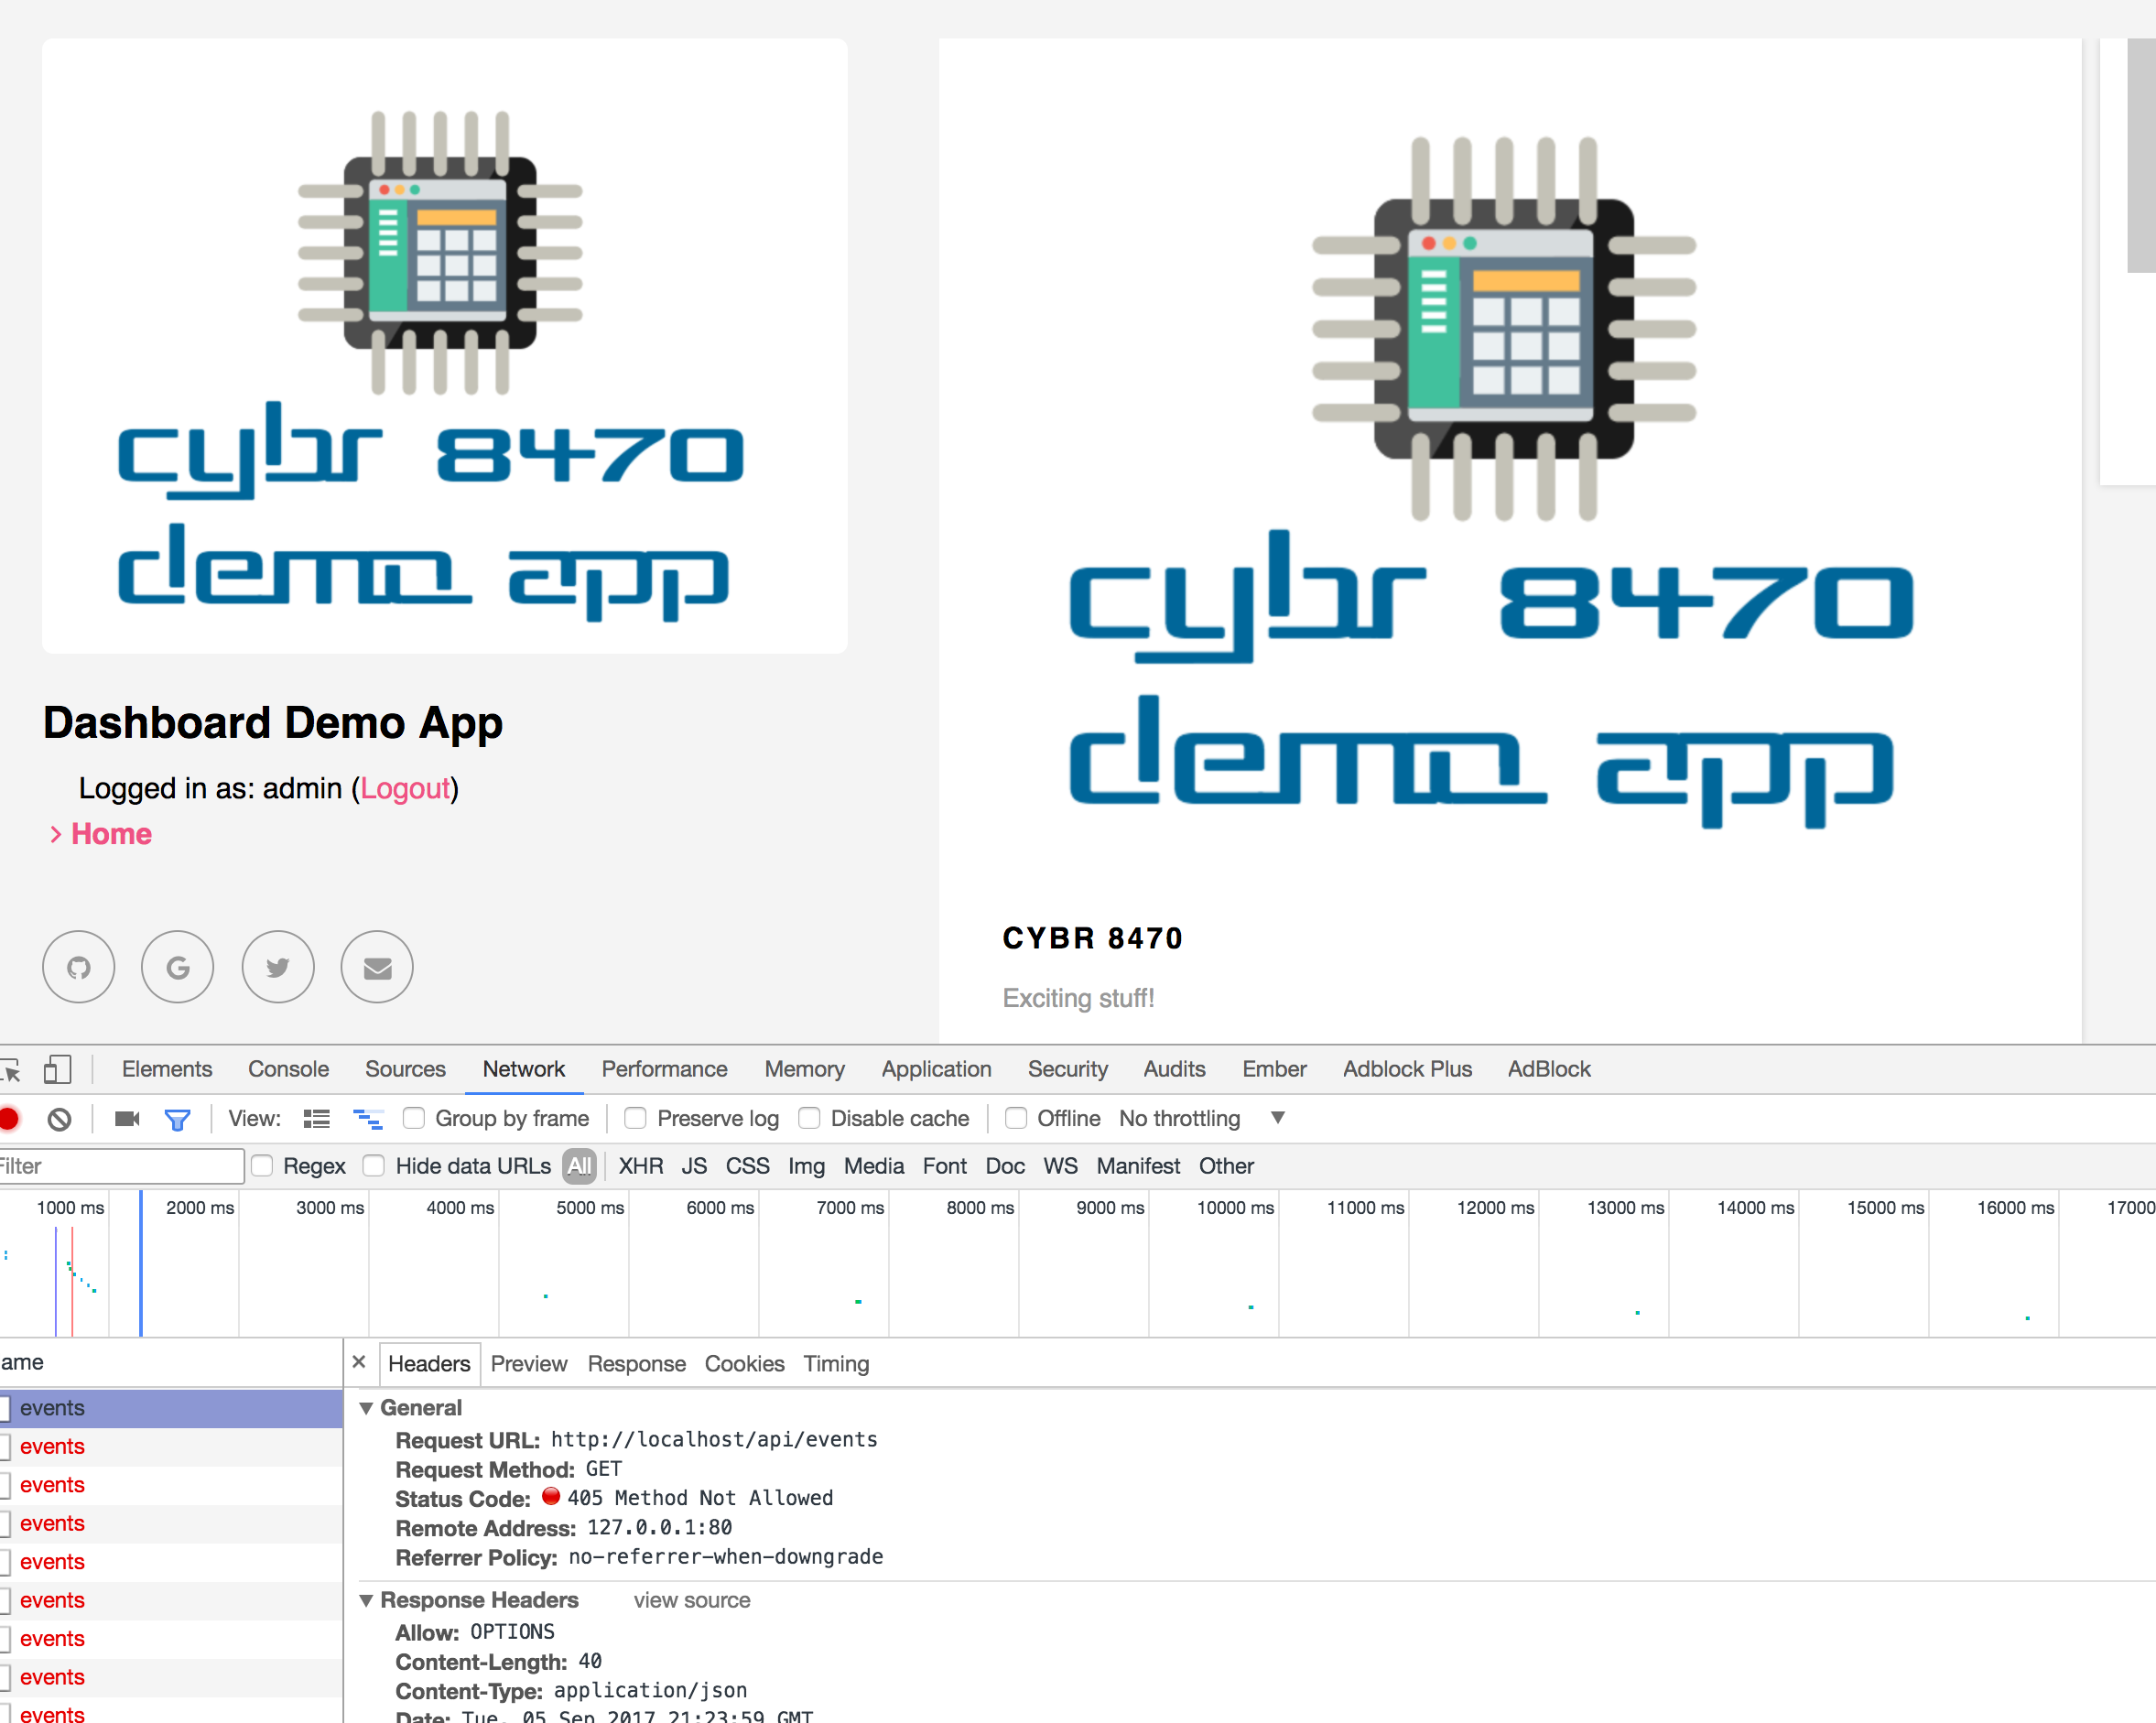
Notice it is making a request to /api/events/ and getting a 405 Method not allow error - because our API does not support this endpoint.
- We can fix this by adding a new
classthat extends the Django REST classAPIViewto implement our endpoint. - An
APIViewallows you to define functions that handleGET(single),GET(list),POST,PUT, andDELETErequests that might arrive at/api/events - The
GET(single) request is used whenever a user wants to get a single item (typically by id), something like/api/events/4would return the event with id 4. - The
GET(list) request is used whenever a user wants to get all of the events. - The
POSTrequest is used whenever a user wants to make a new event. - The
PUTrequest is used whenever a user wants to modify an existing event. - Finally, the
DELETErequest is used whenever a user wants to delete an existing event.
These conventions are not specific to
Djangothey are based onRESTful APIdesign standards.
-
In our
APIViewwe need to create twoREST endpointsfor handlingPOSTrequests andGET(list) requests. -
The
postfunction looks at the incoming request, extracts the data fields from it, and then creates and stores a newEventrecord based on the incoming request data. IF we were working with a real app, another sensor or service could call this endpoint and store data about an event that occured. -
The
getfunction simply queries the database for allEventobjects and returns them to the requestor inJSONformat
class Events(APIView):
    permission_classes = (AllowAny,)
    parser_classes = (parsers.JSONParser,parsers.FormParser)
    renderer_classes = (renderers.JSONRenderer, )

    def get(self, request, format=None):
        events = Event.objects.all()
        json_data = serializers.serialize('json', events)
        content = {'events': json_data}
        return HttpResponse(json_data, content_type='json')

    def post(self, request, *args, **kwargs):
        print 'REQUEST DATA'
        print str(request.data)

        eventtype = request.data.get('eventtype')
        timestamp = int(request.data.get('timestamp'))
        userid = request.data.get('userid')
        requestor = request.META['REMOTE_ADDR']

        newEvent = Event(
            eventtype=eventtype,
            timestamp=datetime.datetime.fromtimestamp(timestamp/1000, pytz.utc),
            userid=userid,
            requestor=requestor
        )

        try:
            newEvent.clean_fields()
        except ValidationError as e:
            print e
            return Response({'success':False, 'error':e}, status=status.HTTP_400_BAD_REQUEST)

        newEvent.save()
        print 'New Event Logged from: ' + requestor
        return Response({'success': True}, status=status.HTTP_200_OK)
- There is a fair bit of code here, so lets break it down. The first three fields sets some parameters to allow this endpoint to be accessible and parsed using a form parser and then displayed using the JSON renderer. If we look at
Django REST Frameworkeach of these items is defined. They are unimportant, at the moment. - Below this, we see the
GETmethod that we need to support our client.- This method makes a database
Queryusing Django’s Database management system (DBMS) to get all of the events..e.g.Event.objects.all() - Once retrieved, the events are serialized as json using a supporting JSON library loaded in python.
- These JSON-serialized events are then dropped into a json object called
events(which is what our client was expecting). - These events are returned back to the client.
- Go ahead and add this method in and save the file.
- This method makes a database
- Below the
GETrequest handler, we also have aPOSThandler.- This takes in a request, parses out the data, and saves a new event to our database of events.
- It uses the request’s header data (in request.META) to log the IP of the user making the request.
- If the data conforms to our validations, the new event is saved and a response message is returned. Otherwise, if the request is malformed, we send a
BAD_REQUESTerror response. - Add this method in and save the file.
- Now that our methods for this endpoint are defined, we need to now create a URL to expose the endpoint to the web.
- open
api/urls.pyand we can see that we already have a url for /events:
new api/urls.py
urlpatterns = [
    ...
    url(r'^events', csrf_exempt(controllers.Events.as_view())),
    ...
]
- This tells Django to serve our new endpoint in controllers.py at the url
api/events - now refresh the app
- examine the console and notice that the GET requests are now succeeding, but no data is being returned.
- now launch
POSTMAN - Craft a request that looks like the following:
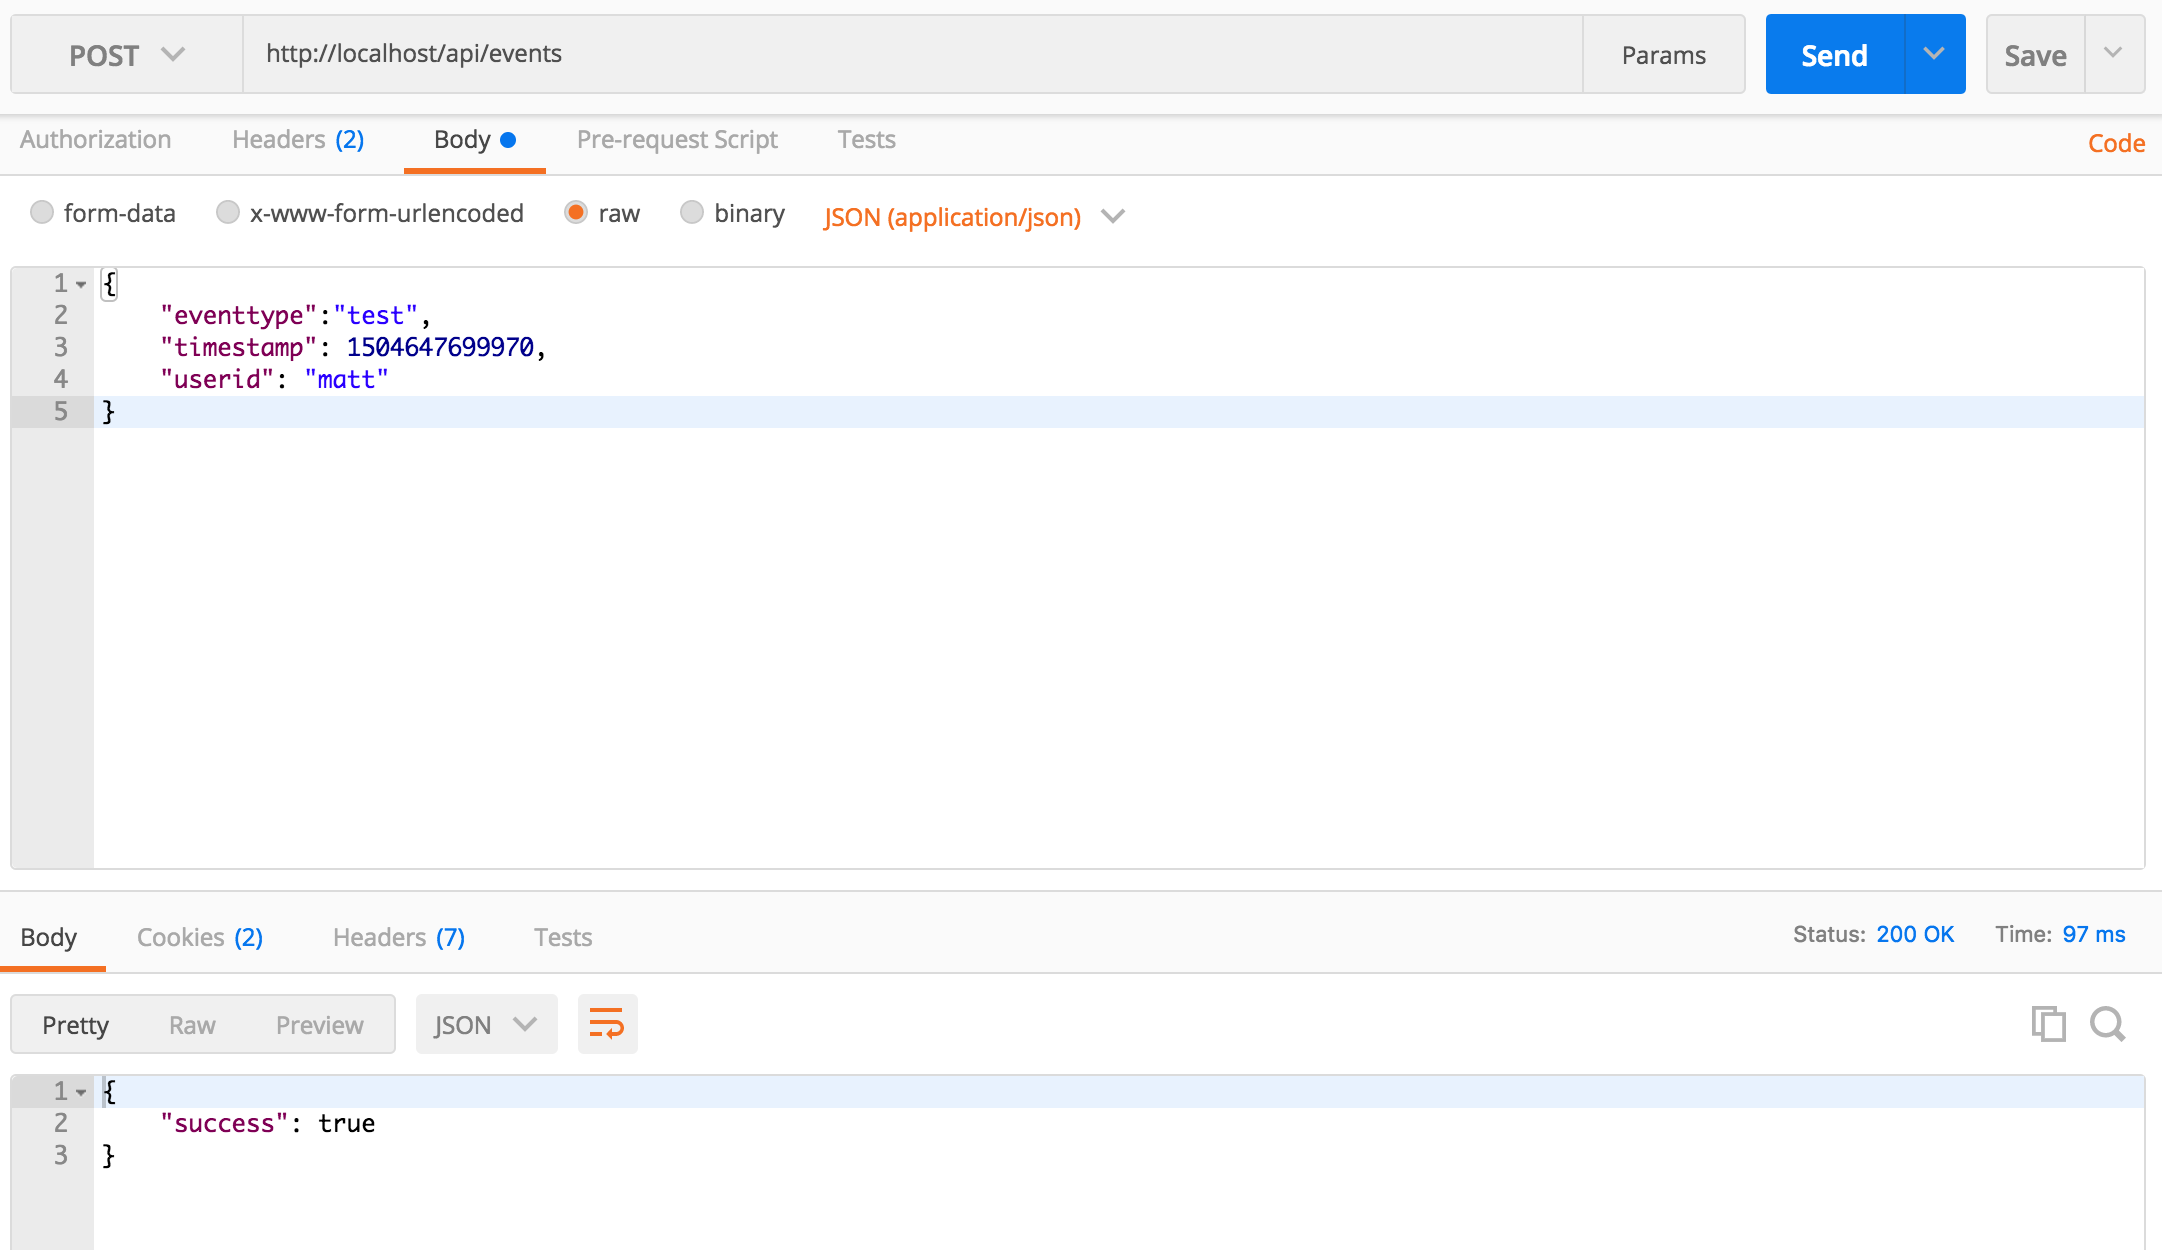
- What happened?
- -> Since we made changes to our code we need to take the server down and bring it back up - this is because we are using a production webserver (nginx). In development you’d be better off using django’s runserver for quick iteration.
- Go ahead and restart your server (press control+C) then do
docker compose up - Now resend your postman request
- Now revist http://localhost and refresh the page. Do you see your event?
- Try posting some more from POSTMAN. It auto-refreshes!
- Well thats neat. What about that other button in the app though to turn IFTTT on?
Checkpoint
- Is the URL
<myserver>/api/eventsa valid URL? - Is the URL
<myserver>/api/sessiona valid URL? - What function gets called when the user visits
<myserver>/api/register? - What would be the result of making a
DELETErequest to<myserver>/api/events? - What would be the result of making a
POSTrequest to<myserver>/api/events?
Step 6: Press the button
Ok, so you now have a loose familiarity with the skeleton backend code that was provided to you. Lets build some more upon it.
Go ahead and click login (on the left hand side menu). Authenticate with the username/password we made earlier (admin/admin1234).
When you login, you should see a green button that says turn IFTTT on when visiting localhost. Time to push it!
- in your browser, go to http://localhost
- press the UI button
- what happened?
- How can we tell?
Lets use the chrome development tools to take a closer look.
- Press F12 (windows) or Right Click on the page -> Select
Inspect - This will bring up the
chrome development toolswhich have a number of very helpful capabilities for debugging websites and inspecting the behind-the-scenes action that happens when you interact with web content
Step 7: Chrome Dev Tools - Your new best friend
Instead of me reinventing the wheel, head over to https://developers.google.com/web/tools/chrome-devtools/ to learn the basics of what Chrome Development tools can do.
When you’ve looked over the different features. Come back and click on the network tab to inspect what is happening with our button.
- If you click on
activateIFTTTyou will see the exact request that is getting sent. - You should see a similar error to
method not allowedlike we saw before. This is because we haven’t actually defined or enabled the activateIFTTT endpoint on the server-side yet. We will do that next. - If you click over to the
responsetab you will see the raw response that the server is returning when this button is clicked.
Step 8: Make a new REST endpoint to make the client button work with the backend
Currently, the server doesn’t know that it needs to do anything special with the URL /api/activateIFTTT so it is just rendering the home page (what we have been looking at this whole time) in response. What we need is for our server to recognize that a new event has occurred from the client and then do something to handle it, in this case, contact IFTTT.
For this to work, we need to create a new REST Endpoint controller to handle the request. Open up your controllers.py file and add a new entry called ActivateIFTTT. This entry will only expose a POST endpoint. The goal is to:
- capture the info from the client
- Retrieve the stored API Key for IFTTT
- Turn on the a webhook named
testand log the resulting event locally
class ActivateIFTTT(APIView):
    permission_classes = (AllowAny,)
    parser_classes = (parsers.JSONParser,parsers.FormParser)
    renderer_classes = (renderers.JSONRenderer, )

    def post(self,request):
        print 'REQUEST DATA'
        print str(request.data)

        eventtype = request.data.get('eventtype')
        timestamp = int(request.data.get('timestamp'))
        requestor = request.META['REMOTE_ADDR']
        api_key = ApiKey.objects.all().first()
        event_hook = "test"

        print "Creating New event"

        newEvent = Event(
            eventtype=eventtype,
            timestamp=datetime.datetime.fromtimestamp(timestamp/1000, pytz.utc),
            userid=str(api_key.owner),
            requestor=requestor
        )

        print newEvent
        print "Sending Device Event to IFTTT hook: " + str(event_hook)

        #send the new event to IFTTT and print the result
        event_req = requests.post('https://maker.ifttt.com/trigger/'+str(event_hook)+'/with/key/'+api_key.key, data= {
            'value1' : timestamp,
            'value2':  "\""+str(eventtype)+"\"",
            'value3' : "\""+str(requestor)+"\""
        })
        print event_req.text

        #check that the event is safe to store in the databse
        try:
            newEvent.clean_fields()
        except ValidationError as e:
            print e
            return Response({'success':False, 'error':e}, status=status.HTTP_400_BAD_REQUEST)

        #log the event in the DB
        newEvent.save()
        print 'New Event Logged'
        return Response({'success': True}, status=status.HTTP_200_OK)
Now that we have the endpoint defined we need to make it available on the web server. Modify api/urls.py to include a new line in the urlpatterns, make it look like:
urlpatterns = [
    url(r'^session', csrf_exempt(controllers.Session.as_view())),
    url(r'^register', csrf_exempt(controllers.Register.as_view())),
    url(r'^events', csrf_exempt(controllers.Events.as_view())),
    url(r'^activateifttt', csrf_exempt(controllers.ActivateIFTTT.as_view())),
    url(r'^', include(router.urls)),
]
This will make the endpoint available on the webserver. Now go back to http://localhost and try to click the button. What happens?
Did you get an error? Did you restart your server? If not, press control+C on the docker terminal and then:
docker compose up
again.
Now try? Did you get a different error?
This is because we haven’t added our API Key to our server, so the field api_key = ApiKey.objects.all().first() returns null (or NoneType). To fix this, open your browser and go to http://localhost/admin/api/apikey/. Click ‘add api key’.
- Then enter your username (probably
admin) in theownerfield. - In the
keyfield add in yourIFTTTAPI key.- To get that, you need to register for an IFTTT account here: https://ifttt.com.
- Once signed up, go to: https://ifttt.com/maker_webhooks to enable webhooks.
- Once enabled, go to https://ifttt.com/services/maker_webhooks/settings.
- Your API Key is the part that comes in the url after
https://maker.ifttt.com/use/
- we also need to create a new webhook applet named
testto receive our events.- go to: https://ifttt.com/create
- for the
IFcondition selectwebhook, then select receive a web request - For the
thencondition you can have IFTTT send you an email or any number of other events. Pick one. When done, save the applet.
-
Now go back to your app at localhost and click the green button. What happened?
-
Since you made some changes to your code repository, lets track the changes with
git: - in a terminal in your lab directory execute the following:
git status
git add -A
git status
git commit -m "added endpoints for events and IFTTT"
git push
note if you have a git authentication error - it is probably because you need to handle your credentials correctly - i recommend github desktop or the git credential manager (https://github.com/git-ecosystem/git-credential-manager)
You just pushed your local changes to remote on github!
Stray observations
- Our new endpoints are each individual
modulesthat exemplifies themodularizationCybersecurity First Principle. They don’t rely on the other modules (endpoints). - We did not hardcode our
API keyin the code to protect it from static lookup - this is an example of theinformation hidingCybersecurity First Principle. - We made use of
abstractionandresource encapsulation. - We’ve made our first
web service!
Step 9: Profit!
Pretty neat. Observe your handy work.
License
Lesson content: Copyright (C) Dr. Matthew Hale 2017-2023.

This lesson is licensed by the author under a Creative Commons Attribution-NonCommercial-ShareAlike 4.0 International License.