CYBR8470
This repo contains a digitized version of the course content for CYBR8470 Secure Web App Development at the University of Nebraska at Omaha.
Containers - A primer
Think shipping containers
- Standard unit of shipping.
- Stackable onto on a ship, train, plane or truck. ⛴️ 🚇 ✈️ 🚚
- Compatible worldwide.

Application containers follow a similar philosophy.
Application containers
- Standard unit of an application’s runtime. (files, libraries, dependencies, sockets, etc)
- Stackable onto a Linux, macOS or Windows Machine.
- Can run anything that would run on a server.
Cybersecurity Principles and Containers
Domain Separation
Good fences make good neighbors:
- We can separate an application’s environment into ‘fenced off neighbors’
- It is good to separate source code from runtime environment
Modularization
Modular programming is a software design technique that emphasizes separating the functionality of a program into independent, interchangeable modules.
- Containers separate services from each other (Web service, Database, Application Server, etc)
Resource Encapsulation
Encapsulation is an object oriented concept where all data and functions required to use the resource are packaged into a single self-contained component.
- Containers provide a standard interface between the host or other containers.
- They also only expose legitimate application interfaces.
Process Isolation
Process Isolation keeps separate functions from accessing the same memory.
- Limit damage/crashes to a single container
- Processes in a container cannot directly access resources in another container
Introduction
Lesson goals
- Deploy, run, and publish a container
- Make and manage interactions between containers
- Use containers to setup a development environment
- Network containers together
Materials required
Prerequisite lessons
Table of contents
Deploy, run and publish a container
Manage container interactions
Setting up a dev environment
Additional Resources
Acknowledgements
License
Deploy, run and publish a container
Your first container
Let’s start with a container based on Alpine Linux
- Alpine Linux is a security-oriented, lightweight Linux distribution
First, we need to download a container blueprint called an Image
- Open a Windows Powershell instance:
# Download alpine container image from Docker Hub
docker pull alpine
You should see some download activity. What just happened?
Container images
Docker hub is a registry of images from authoritative sources and individual users
- By default, the
latestimage is downloaded. This label is called a Tag - Other tags allows downloading specific versions or those shared by other users
Let’s check locally available images and note their sizes.
# Check images available locally on your machine
docker images
Observation: Docker images are much smaller than typical Virtual Machines
Running your first container
Let’s create and start a container from the alpine image
# See list of docker commands
docker
# `run` executes a command in a new container (creates it too)
# -it provides an interactive tty shell into the container
# --name provides a name for your new container
# `alpine:latest` is the image name and its tag
docker run -it --name myAlpine alpine:latest
if the previous command was successful, the container is created and you are returned an interactive shell into the container. The shell looks like this: / #
Explore the container
Try some commands in the container shell
# Some commands to try
whoami # enuf said!
cd /   # Switch to the root directory
ls -la # List contents of the root directory
ping google.com # Hit CRTL+C to exit
exit # Stop the shell to exit container
Observations
- Host directories and files are inaccessible
- The container can connect to websites and receive responses
- You were running as
rootin the container!
Cleanup
- Let’s see the containers that we created. This command shows both running and stopped containers.
docker ps -a - Using the name of a container we can delete containers that are stopped.
docker rm <container-ID or name>
This is so cool… 😎
Manage container interactions
Container volumes
- Containers are short-lived
- Code and data persist over longer periods
- Volumes are externally mapped storage areas for a container
- Shared folders on host, Shared drives on network, etc.,
Mount a host directory as a data volume
Volumes have to be initialized at container creation time
- The
-voption mounts a volume
In a new Powershell:
# Create a new host directory called app
mkdir app
# Host /app folder mapped to container /webapp folder
# `\` allows you to continue a long command on a new line
docker run -it --name myAlpineWithVol -v /c/Users/student/app:/webapp alpine:latest
You may get a prompt to share the C: drive with Docker. Accept that and enter the your account password. Once access is granted, a container shell will be returned.
Volume configuration
Caution 😡:
By default, a mounted volume allows full read/write by the container
This allows exceptions to the Process Isolation principle
- May set it to read-only (Least privilege principle)
-v /c/Users/student/app:/webapp:ro
- Caching option improves performance
-v /c/Users/student/app:/webapp:cached
Test the mounted volume
In a new Powershell:
# Change directory to the `/app` directory on the host
cd app
# Create a new file and add some text
set-content test.txt "Nebraska Gencyber Rocks"
Back in the container shell:
# List contents of the test.txt file
cat test.txt
# You should be able to see the file contents
Observation: Container and host are able to share files.
It is always good stop containers when not in use to free up system resources.
In a new Powershell:
# List all running containers
docker ps
# Stop a running container
docker stop myAlpineWithVol
Totally cool… 🤓
Exposing Container Services
Services are bound to container ports. We need to expose container ports to the network to access these services remotely.
An HTTP Server Container
Let’s create a container that runs an HTTP server in two commands! First, download an image for Lighttpd from Docker Hub
In a new Powershell:
# download a container for lighttpd, a lightweight HTTP server
docker pull gists/lighttpd
In a container spawned from this image, we need to expose Port 80 to access the web server.
We do this by mapping the container’s port to a port of the host
Host - Container Network
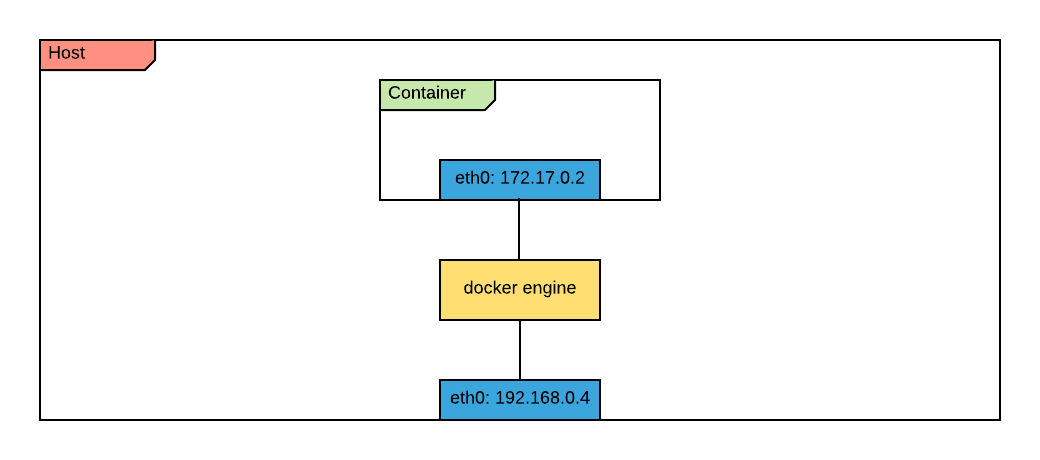
Host-Container Port Mapping
Port mappings have to be initialized at container creation time
- The
-poption maps a host port to the container port
In Powershell:
# -d option runs the container in detached mode (background)
# -p 8888:80 maps host port 8888 to container port 80
# -v maps the host app directory to the web directory in the container
docker run -d --name lighttpd -p 8888:80 -v /c/Users/student/app:/var/www gists/lighttpd
# Check the mapped port in container listing
docker ps -a
Test the mapped port
Since we have a volume mapped, let’s author a simple HTML index file and drop it in the web root of the container. We should be able to browse to this page if the port mapping works as expected.
In a new Powershell:
# Change directory to the `/app` directory on the host
cd app
# Add a simple HTML file exclamation marks
set-content index.html "<html>My first Container App</html>"
Now browse to http://localhost:8888
Testing continued…
Return to Powershell:
# Update the HTML file
set-content index.html "<html><h1>Cool</h1></html>"
Now browse to http://localhost:8888
Reflect on what just happened 🤔
Observations:
- Separation of persistent code from the application runtime
- Host file updates are instantly reflected in the container application
😎 Cool!
Cleanup
Let’s stop the container service and delete the container before we move on.
# Stop a running container named lighttpd
docker stop lighttpd

# Delete container named lighttpd
docker rm lighttpd

# List all containers (running or stopped)
docker ps -a
Setting up a dev environment
Container build automation
Typing long docker commands in a terminal is cumbersome 😖
Luckily, a Dockerfile automates the build process. This is Akin to a “recipe” that the Docker engine understands.
Dockerfile
-
Examine the
Dockerfileforgists/lighttpdimage that we pulled from Docker Hub earlier: https://github.com/iHavee/dockerfiles/blob/master/lighttpd/Dockerfile -
Here is a reference for Dockerfile directives: https://docs.docker.com/engine/reference/builder/
A Django Dockerfile
# Start with this base image
FROM python:2.7.13
# Set environment variables
ENV PYTHONUNBUFFERED 1
# Set the working directory in
# which RUN and CMD options will run
WORKDIR /var/www/backend
# RUN commands run at container build time
# Used to install applications
RUN pip install Django
RUN pip install djangorestframework
RUN pip install markdown
RUN pip install django-filter
RUN pip install psycopg2
Basic automation workflow
Step 1: Clone a repository
Let us clone a repository that includes the above DockerFile.
The DockerFile is typically in the top level project directory. For this we are going to use a recent web server demo we used this summer in a GenCyber camp. The server was built to interact with little IoT devices and show events gathered from the device.
In a new Powershell:
# Switch to Desktop
cd ~/Desktop

# Clone the dev repository
git clone https://github.com/mlhale/nebraska-gencyber-dev-env

# Switch to the cloned repository
cd nebraska-gencyber-dev-env/


git submodule sync
git submodule update --init --recursive --remote
cd backend/
git checkout tags/step-10-server
Step 2: Examine the included DockerFile
In Powershell:
# Switch to the cloned repo directory
cd ~/Desktop/nebraska-gencyber-dev-env
# Examine the DockerFile
get-content Dockerfile
Step 3: Build the image
In Powershell:
# Use the `build` command and supply a DockerFile
# `-t` option provides a name and tag for the image
docker build -t django:dev .
# List local images
docker images
If the build is successful,
djangoappears in your local image listing
Cleanup
Here is how to delete the image we just created.
In Powershell:
# Use the `rmi` command and supply an image name
docker rmi django:dev
# List local images
docker images
If the command is successful,
djangois removed from your local image listing
Tip: To delete a container, use the command
docker rm container-name
Automating Multi-Container Application Build
Apps may require additional services in their environment. For example a Database Service
The docker-compose tool automates building your app’s services all at once
and links them as described in a docker-compose.yml file
Django with Postgres Database
docker-compose.yml file:
# Compose file format version
version: "3"
# Declare services
services:
  # Name of the Postgres Database service
  db:
    # Behavior upon container exit
    restart: always
    # Base image is postgres
    image: postgres
    # Per-service volume list
    volumes:
      - postgres-config:/etc/postgresql
      - postgres-data:/var/lib/postgresql/data
      - postgres-logs:/var/log/postgresql
      - ./database-backup:/database-backup
  # Name of the Django service
  django:
    # Use the Dockerfile to build this image
    build: .
    # Overide the default command
    command: python /var/www/backend/manage.py runserver 0.0.0.0:8000
    # Per-service volume list
    volumes:
      - ./backend:/var/www/backend
    # Expose ports
    ports:
     - "80:8000"
    # Link Django to Postgres
    depends_on:
     - db
# Declare named volumes
volumes:
  # These keys are left empty to use docker engine defaults
  postgres-config:
  postgres-data:
  postgres-logs:
Building with Docker-Compose
The docker-compose tool can build containers with a single command.
In a new Powershell:
# Switch to project directory
cd nebraska-gencyber-dev-env
# build images
docker-compose build
# List local images
docker images
If the build is successful,
nebraskagencyberdevenv_djangoappears in your local image listing. Services are built once and then tagged, by default asprojectname_service
Easy Peasy 😏
Run the App
Before running the built containers, often additional configuration steps are needed.
The steps below are specific to our setup and will vary with applications
In the previous Powershell:
# run option executes a one-time command against a service
docker-compose run django bash
In the returned container shell:
# Perform Django configurations
python manage.py makemigrations
python manage.py migrate
python manage.py createsuperuser --username admin --email admin
exit
Back in the previous Powershell:
# One simple command to start the entire application
docker-compose up
Navigate to http://localhost to examine the running app.
Super cool 🤓
Shutting down multiple containers
While pressing CRTL+C in the terminal once will shutdown the containers, here is a better way.
In a new Powershell
# Examine running containers
docker ps
# Gracefully shutdown the containers
cd nebraska-gencyber-dev-env
docker-compose stop
docker-compose downcommand will shutdown and delete the containers. So be careful when using the down command.
Profit!
Pretty neat. Observe your handy work.
May the force of containers be with you! 😎
as you take this quiz… https://www.qzzr.com/c/quiz/430097/the-container-quiz
Additional Resources
For more information, investigate the following:
- Container 101 - What is a container
- Docker Documentation - All things docker
- Dockerfile - Authoring Reference
- docker-compose.yml - Authoring File Reference
- Volume - Manage Data in Containers
- Container Networking - Connect Containers to a Network
Acknowledgements
This tutorial was initially inspired by this blog post by James. Thanks to thoughtful comments and reviews by Dr. Matthew L. Hale
License
Modified for CYBR8470 by Matt Hale.
Nebraska GenCyber Overall content: Copyright (C) 2017 Dr. Matthew L. Hale, Dr. Robin Gandhi, and Doug Rausch.
Lesson content: Copyright (C) Robin Gandhi 2017.

This lesson is licensed by the author under a Creative Commons Attribution-NonCommercial-ShareAlike 4.0 International License.