CYBR8470
This repo contains a digitized version of the course content for CYBR8470 Secure Web App Development at the University of Nebraska at Omaha.
Firewalls
Firewalls are often a first line of defense for an enterprise or home network. In this unit we will understand the fundamentals of firewalls, write firewall rules that configure its behavior and then test if the firewall performs as expected.
Cybersecurity First Principles
- Minimization: Minimization refers to having the least functionality necessary in a program or device. The goal of minimization is to simplify and decrease the number of ways that software can be exploited. This can include turning off ports that are not needed, reducing the amount of code running on a machine, and/or turning off unneeded features in an application. This lesson focuses specifically on turning off ports that aren’t in use.
Table of Contents
Overview
Firewalls as a Collection of Valves
Firewall Rules
Working with iptables
Making Firewall Settings Persistent
Additional Readings
Teacher Developed Modules
Acknowledgements
Overview
The name firewall is inspired from its physical manifestation in construction which refers to walls that are designed to stop a fire from spreading.

While these firewalls are “cool”, we are interested in a different kind of firewall. Namely, the ones that protect internal networks from external networks. These kinds of firewalls allow us to control the flow of information between networks. Firewalls, minimize the number of ways that internal networks and computers on them can be exploited. They also encourage least functionality by turning off ports that are not needed. Firewalls can also drop network traffic that does not conform to expected patterns (such as malicious requests to an application server).
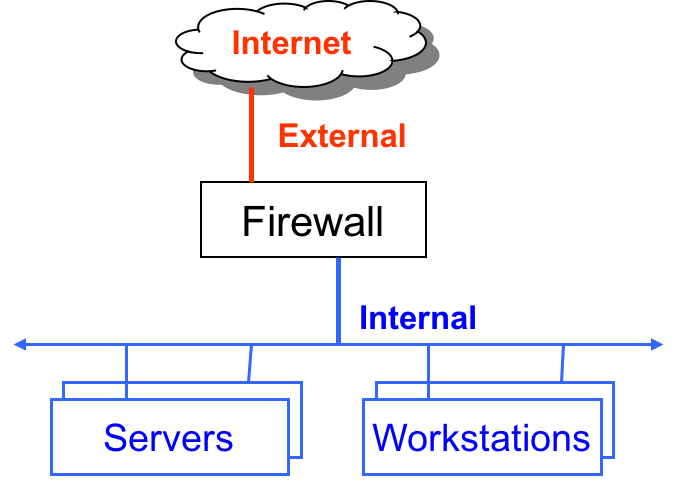
All popular operating systems now come with a firewall installed. For server installations we will focus on the NETfilter packet filtering module built into the linux kernel itself. This module is configured using the iptables command issued in a terminal. The iptables provides a lot of flexibility and control over the configuration of the firewall.
In order for two machines to communicate (such as a client talking to a server), there are many different layers that are involved. Each of these layers is progressively lower level as you move downward. In general there are 7 layers:
- Application - The highest level layer where application data is handled (http/ftp/DHCP/SSH/SSL, etc)
- Presentation - often the same as the application level, sometimes acts as a translate between application and session
- Session - The layer that is used to form sessions between applications (often issues remote procedure calls (RPCs))
- Transport - One of the two layers that are foundational to the modern internet (TCP / UDP), this layer serves to transport packets from one host to another.
- Network - The second of the foundation layers for the modern internet (IP, IPv4, IPv6, IPSec, etc). This layer serves to transport packets between routers (often referred to as packet forwarding).
- Data Link - The biggest example of the data link layer is ethernet. It provides a protocol for exchanging data over a local network.
- and Physical - This layer is nothing but raw bits that underly the higher level interpretation of those bits at higher levels.

Question
At what [network layer] (https://support.microsoft.com/en-us/kb/103884) does it make the most sense to operate a firewall, considering that it is connecting two different networks?
- Physical layer
- Data link layer
- Network layer and above
Discussion:
The headers on ethernet frames at the Data link layer and below are not useful for routing across networks. Firewalls rules are authored using routing information starting at the Network (also called the IP layer in the TCP/IP implemenation) layer and above, all the way to the application layer. As a result IP layer firewalls are the simplest and most widely used.
Firewall as a Collection of Valves
A Firewall can be understood as a collection of valves
- Each valve/port corresponds to single service at the application level (e.g. http, ssh, https, smtp)
- Each valve can
- Permit traffic in one or both directions
- Deny traffic
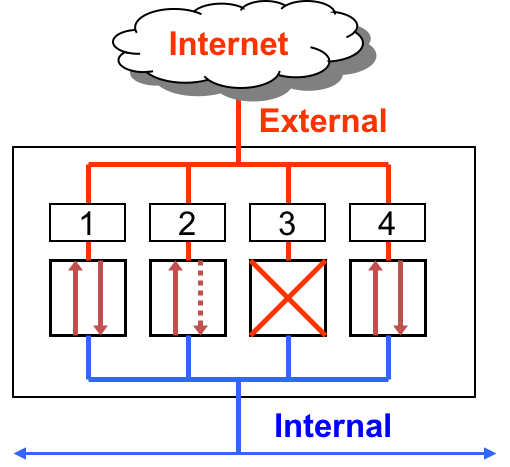
Here are three basic scenarios to keep in mind.
First lets consider, Ports 1 and 4. These ports are open. Which means they permit packets from internal and external sources. So in the case of the TCP protocol, which forms explicit connections or circuits before transmitting data via a handshake mechanism, such connections can be externally or internally initiated.
In the case of Port 2, it allows unrestricted flow of information if the connection is initiated internally. However, it blocks all external requests to initiate an information flow. That is, it permits packets from external sources only if they correspond to a “connection” initiated by an internal source. The firewall will not permit connection requests from external sources. This restriction is useful when an internal web client initiates a web browsing request, then the firewall will allow the corresponding incoming response from an external webserver to pass through the firewall. Any connection initiated externally will not be allowed.
Finally, Port 3 is closed. Which means that it denies all traffic. A closed port may just drop the packets or send back a RST or “Reset” packet. From a security and resource consumption standpoint, it is always better to just drop the packet. Upon denial of access, no additional or useful information should be communicated back.
Firewall Rules
Firewalls are configured using simple if then rules. In a packet filtering firewall, a rule says: if source, destination, protocol, and service match a pattern THEN take this action. Since there are many rules involved, the order of the rules matters. A LOT!
Rules are evaluated in order, starting with the first one at the top until a first match is discovered. If your top rule is very generic, i.e. matches almost every packet, then none of the later specific rules will ever be evaluated. So it best to start with rules that are the most restrictive (i.e rules that focus on to specific services and have a very small chance of interfering with other rules). After ordering by restrictiveness it is then best to order rules according to how well they match the majority of your network traffic. This minimizes the number of checks required to find a matching rule.
Always start firewall configuration with a whitelisting philosophy, where you “Deny by default” and then allow only specific information flows. This means, start the firewall configuration by dropping all packets. Then add rules to allow specific traffic patterns as required by application needs.
Lets look at an example.

Rule 1 permits externally initiated requests to a webserver behind the firewall. So the source is “any”, since we cannot anticipate a specific IP address at the time of writing the rule. The destination is the IP address of the webserver and the service specifies the port number where the service is typically hosted. That would be port 80 for a web server. If these three match an incoming packet then the action is “ACCEPT”
Rule 2 permits internally initiated requests out to the Internet. So the source is any ip address in the local network, which we specify as a range of IP addresses but stated here as “localnet”. The destination and the service cannot be anticipated at the time of writing the rule so both are specified as “any”. If a packet matches these conditions then the action is “ACCEPT”.
Rule 3 is to deny all other traffic that does not match the previous rules. So all three match conditions are specified as “any” and the action is “REJECT”.
Question
What would happen if we re-ordered these rules? Specifically if Rule 3 was exchanged with Rule 1.
Discussion: Rule 3 is often implemented as a “Default Policy”, instead of an explicit rule in the table. This policy applies ONLY if a packet matches NONE of the rules specified for the firewall. More on this shortly.
Working with iptables
As mentioned before Linux has a firewall built right into the kernel and it is configured using the iptables command. Since it is a utility for privileged users, you will need to first elevate your privilege level using sudo prepended to the iptables command. Do this everytime an iptables command is issued. See code block below.
This firewall can be set up in several modes like packet filtering, which is the default mode, network address translation, and many others such as mangle, where you can modify the packets as they pass through the firewall. We will focus on the IPv4 packet filtering function here.
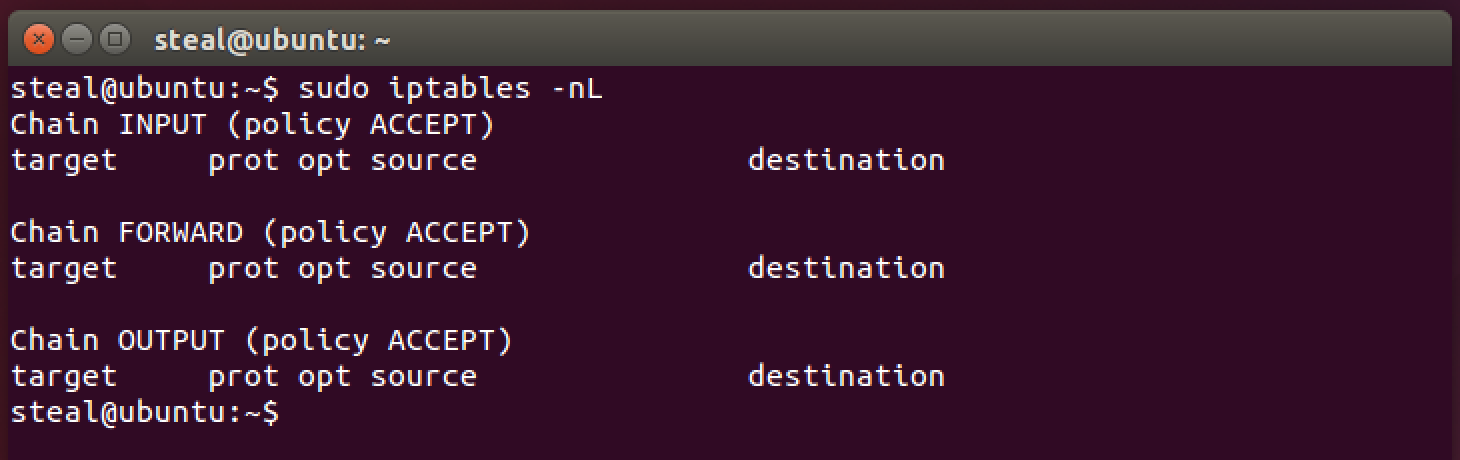
To view your current firewall rules, fire off this command in your Linux Server VM. Enter your password if prompted.
sudo iptables -nL
You should see something like this:
What are those -nL commandline parameters for?
-n This option tells iptables to not resolve domain names for the ip addresses in the matching rules. This results in faster display of the rules.
-L Lists all the rules in a specified chain. If no chain is specified then all chains are listed.
But wait! what is a Chain? A chain is a list of rules that can match a set of packets. It is similar to the example table that we discussed before. There are several built-in chains: INPUT, FORWARD and OUTPUT. For packet filtering, INPUT and OUTPUT chains are sufficient. As their names suggest, INPUT chain is a set of rules that match the “incoming” packets to your computer. Similarly, OUTPUT chain is a set of rules that match the “outgoing” packets. In the screenshot you can observe that currently both of these chains are empty! Also (policy ACCEPT) suggests that the default policy for both chains is set to ACCEPT all packets. So essentially, your firewall is WIDE OPEN at this point. We better start to close it!
A note before we move forward: When in doubt, consult the iptables manual pages using the following command:
man iptables. Alternatively, here is a web version.
Based on a whitelisting philosopy, let’s begin by denying all traffic by default.
sudo iptables -P INPUT DROP
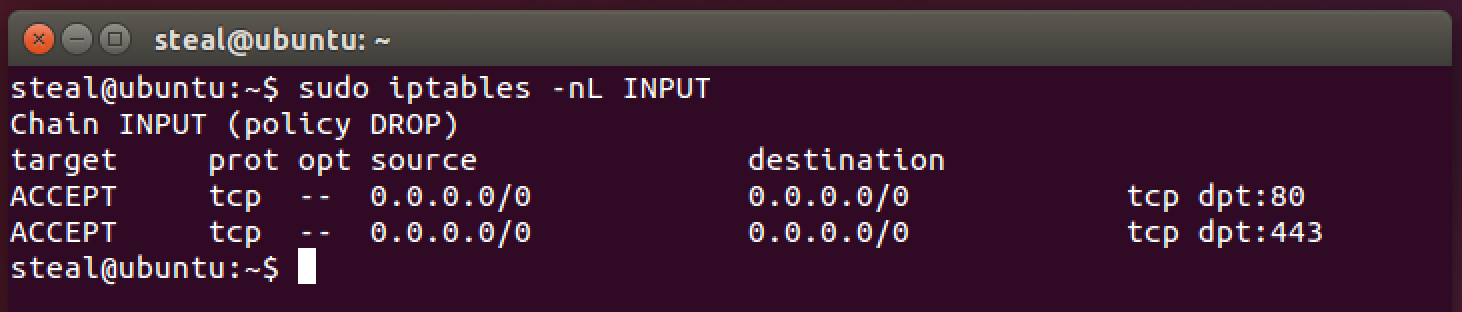
This command uses the -P switch to set the default policy for the INPUT chain to DROP. This means drop all incoming packets to your computer. Let’s see what the INPUT chain looks like now.
sudo iptables -nL INPUT
You should see something like this.

Notice (policy DROP). You should NOT be able to access your server now from your client web-app. Go ahead and try it!
A firewall that does not allow any traffic, while secure, is not very user friendly or useful. So let’s add some rules to the INPUT chain to allow incoming packets on the default web port, i.e. port 80.
sudo iptables -I INPUT 1 -p tcp --dport 80 -j ACCEPT
This iptables command follows a general structure: iptables <option> <chain> <matching criteria> <target>
Let’s examine each element in this structure in detail.
<option> <chain>
Immediately following the iptables command the option component allows us to specify the position in which the rule will be inserted into a chain. For example –A INPUT appends the rule in the INPUT chain. –I OUTPUT 3 inserts the rule at a specified position in the OUTPUT chain. The rule numbers start at position 1.
So this option -I INPUT 1 says: Insert this Rule at position 1 in the INPUT chain.
A few more useful options:
–Dto delete a rule in a specified position in the chain.–Fis for flushing the chain, which deletes all rules in a chain.
<matching criteria>
Next comes the match criteria component. This components specifies the conditions that will be used to match specific types of incoming network packets.
So this matching critiera -p tcp --dport 80 says: Match all packets with the TCP protocol with a destination port 80. Again, port 80 on the server is your default webserver port. We did not specify any source or destination IP addresses so it will match all IP addresses. For incoming packets, the “destination” is the server where you are authoring the iptables rules, and the “source” is the client computer. For outgoing packets, the “source” is the server and the “destination” is the client computer.
<target>
Finally the target component specifies what to do if the matching criteria is met. This component is specified with a -j switch. It siginifies a “jump” to the target chain that follows after it. So if an incoming packet passes the matching criteria, then the next rule is specified by the value of the target chain, which can be the name of a user-defined chain or one of the special values that terminate the rule processing. The special terminating values are ACCEPT, DROP, or RETURN.
ACCEPT allows the packet in. So this target -j ACCEPT says: Jump to ACCEPT this packet and terminate the rule processing.
DROP and REJECT, both deny the packet and stop rule processing. But, DROP is safer than REJECT. When REJECT is used, an error packet is sent in response to the matched packet. It is best to avoid giving additional information when access is denied for any reason.
A non-terminating target chain is the LOG chain. The LOG chain helps to document any anomalies that have been detected in the kernel log. Log prefixes are specified using the following syntax:
--log-prefix prefix. The prefix can be about 29 characters long.
Let’s examine the INPUT chain now.
sudo iptables -nL INPUT

This output looks very similar to the example table that we discussed earlier. Here source and desination ip addresses of 0.0.0.0\0 is equivalent to “any”. So the rule is equivalent to saying, match all TCP packets from any source to any desitination with a destination port 80.
If you did it right, your webserver should be accessible again. Go ahead and confirm.
What about other ports? You would also need port 443 for HTTPS to be open. To do this we need to add another rule. This time let’s append it to the INPUT chain using the -A option.
sudo iptables -A INPUT -p tcp --dport 443 -j ACCEPT
Notice that with -A you do not have to specify the rule number. The rule just gets added to the bottom of the INPUT chain. Let’s look at the INPUT chain now.
sudo iptables -nL INPUT
The secure web portion of your server should also be now available to client apps. Go ahead and confirm.
If your website defaults to https then you may consider making the port 443 rule the first rule. This will avoid unnecessary evaluation of the port 80 rule for most network packets.
Are these rules enough? Yes. But, just these rules can be very restrictive and may hamper debugging. For example, try running the following command on your server to update its software repositories.
sudo apt-get update
This command will most likely timeout due to firewall restrictions. The error messages are not likely to be useful either. So let’s add a few additional firewall rules will make server administration and updates much easier.
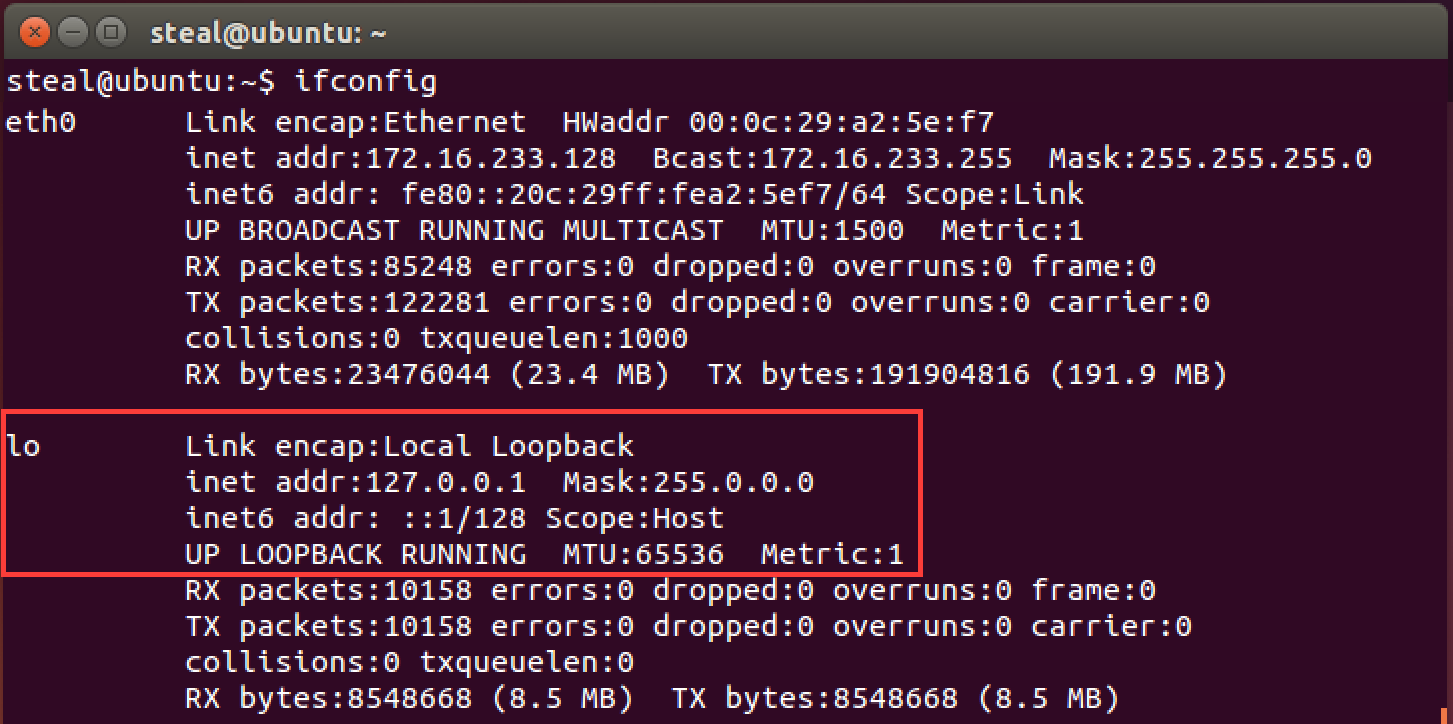
First you want the server to be able to communicate with itself. This is often called sending traffic to “loopback” interface. Also, a special network adapter is dedicated to the loopback interface. You may check its name by using the ifconfig command. This command shows all the network adapters and associated network addresses. Below we see that the name for the loopback adapter is lo.
To author a permissive firewall rule on the INPUT chain we use the -i lo matching criteria for the input loopback interface, with the target ACCEPT.
sudo iptables -A INPUT -i lo -j ACCEPT
Next we want to be able to “ping” the server from any other machine to determine reachability. “Pings” are based on the ICMP protocol and the specific type of message is echo-request. Hence the matching criteria becomes -p icmp --icmp-type echo-request.
sudo iptables -A INPUT -p icmp --icmp-type echo-request -j ACCEPT
Finally, we want to allow all “incoming” packets that are in response to a internal server request. Such response network packets are said to be in a ESTABLISHED or RELATED state. Such a firewall rule requires tracking the state of various network connections. Hence, we invoke the conntrack module using the -m switch. The entire matching criteria is specified as -m conntrack --ctstate ESTABLISHED,RELATED. The --ctstate switch is an abbreviation for “connection state”.
sudo iptables -A INPUT -m conntrack --ctstate ESTABLISHED,RELATED -j ACCEPT
These rules should make your server much more convenient to operate. Try running the update command now.
sudo apt-get update
It should succeed now.
There many other advanced firewall rules that can be authored. But these set of rules should be sufficient to demonstrate the inner workings of a Firewall. We have also managed to significantly reduce the exposed ports of the server to those that are absolutely necessary for our application to work. Nothing more. Any IPv4 network traffic that does not match our rules will be processed by the default policy. In our case, the default policy is DROP.
For more details on iptables, consult these web resources:
Ubuntu iptables Wiki
CentOS iptables Wiki
Discussion: Now step back and ponder this question: Have I taken care of all network openings into the server?
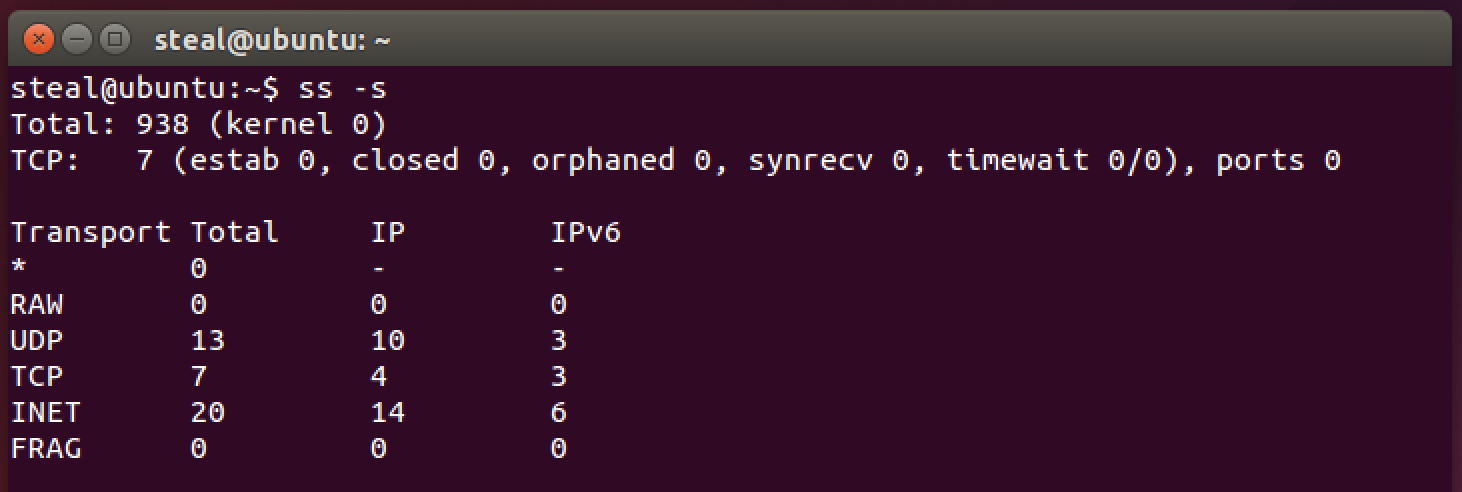
Let’s check something. ss is a great linux network utility. Among other things it shows a summary of network statistics.
ss -s
Notice anything in the output?
How about now?
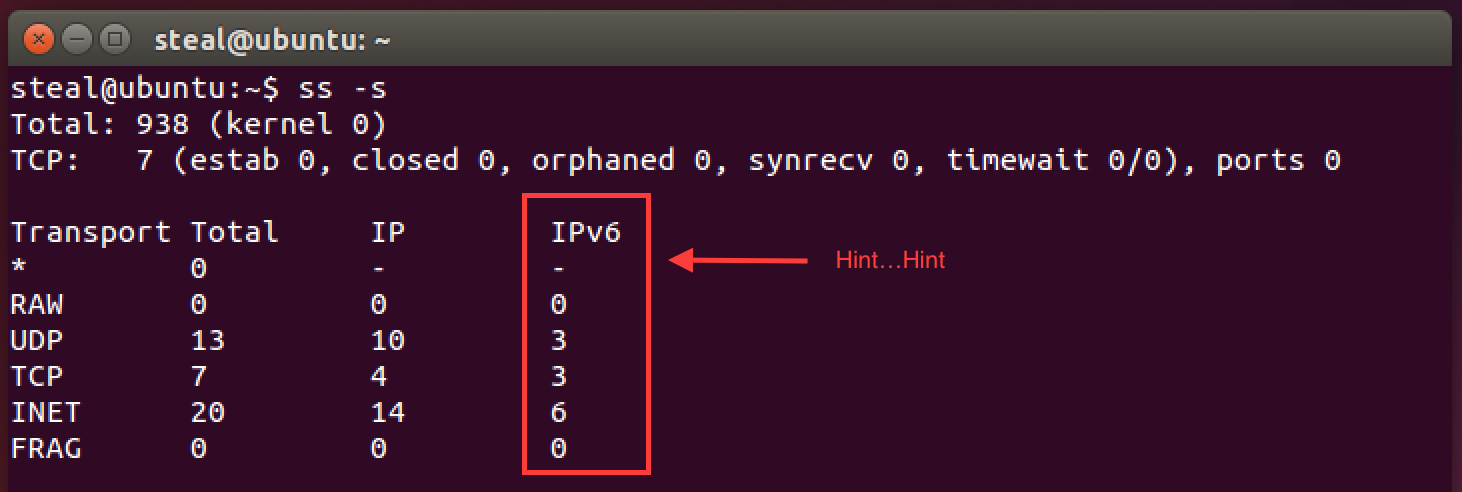
Turns out we controlled the IPv4 network interface, but completely forgot about IPv6. This happens a lot in real systems too. In particular, while port 22 for ssh access may be blocked in IPv4, but it is often left accessible using a IPv6 address. Check if that is the case with your server.
Run the following command to check the state of IPv6 interface on our server. Notice the 6 in the ip6tables command.
sudo ip6tables -nL
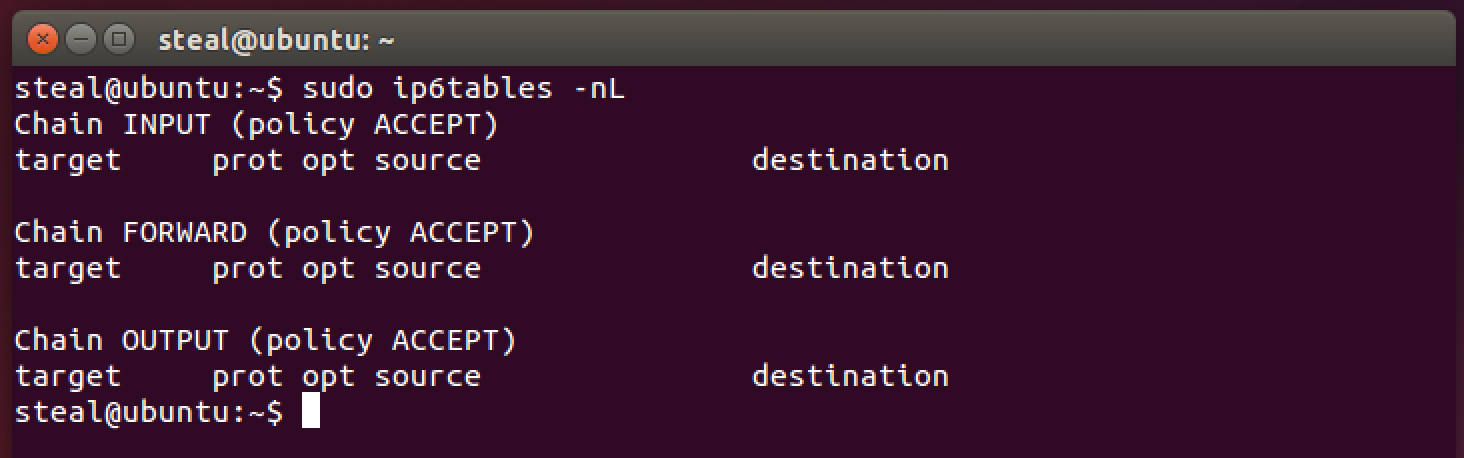
The IPv6 network interface is WIDE OPEN!!! So if a ssh service was running, it would be easily accessible using the IPv6 address.
Let’s fix this by setting the default policy on all IPv6 chains to DROP.
sudo ip6tables -P INPUT DROP
sudo ip6tables -P OUTPUT DROP
sudo ip6tables -P FORWARD DROP
Check if the settings were correctly applied.
sudo ip6tables -nL
Making Firewall Settings Persistent
Unless you commit your iptables rules to a specific location, they will be reset upon machine restart. Now we don’t want that to happen, so let’s save the rules and make them persistent across machine reboots. The following commands will work on Ubuntu OS.
sudo apt-get install iptables-persistent
iptables-save > rules.v4
sudo cp rules.v4 /etc/iptables/rules.v4
ip6tables-save > rules.v6
sudo cp rules.v6 /etc/iptables/rules.v6
That’s it for Firewalls in this Unit. Happy Surfing.
Firewalls are an essential component of “Defense-in-Depth” strategy. It can certainly slowdown an attacker. However, firewalls cannot keep a determined adversary out. There are many ways in which firewalls can be abused and easily bypassed. Such attacks need to be constantly monitored using Intrusion Detection Systems (IDS) and Network Monitoring solutions. The final line of defense is applications built using secure coding practices and proper encryption implementations.
Additional Readings
- Observe the output of the following command:
sudo iptables -v -L - Listing rules in plain format:
sudo iptables -S - 25 Most Used iptables commands, The Geek Stuff
- [Microsoft The OSI Model’s Seven Layers Defined and Functions Explained] (https://support.microsoft.com/en-us/kb/103884)
- Ubuntu iptables Wiki
- CentOS iptables Wiki
Special Thanks
- A special thanks to Matt Hale, Aaron Vigal and Cade Wollcot for reviews of this module and thoughtful discussions.
License:

Cybersecurity Modules by Robin Gandhi is licensed under a Creative Commons Attribution-NonCommercial-ShareAlike 4.0 International License.
Slightly modified for this class by Matt Hale 2016.