Building a server
Cybersecurity First Principles in this lesson
-
Abstraction: An abstraction is a representation of an object or concept. It could be something such as a door, a speedometer, or a data structure in computer science. Abstraction decouples the design from the implementation. The gauges in an automobile are an abstraction of the performance of a car. A map is an abstraction of the earth.
-
Data Hiding: Data hiding is the technique that does not allow certain aspects of an object to be observed or accessed. Data and information hiding keeps the programmer from having complete access to data structures. It allows access to only what is necessary.
-
Layering: Cyber security uses multiple layers of defense or protecting information. If one layer is defeated the next layer should catch it.
-
Least Privilege: One of the ways to protect information is by limiting what people can see and do with your information and resources. The principle of least privilege says to allow the minimum number of privileges necessary to accomplish the task.
-
Minimization: Minimization refers to having the least functionality necessary in a program or device. The goal of minimization is to simplify and decrease the number of ways that software can be exploited. This can include turning off ports that are not needed, reducing the amount of code running on a machine, and/or turning off unneeded features in an application.
-
Modularization: The concept of modularity is like building blocks. Each block (or module) can be put in or taken out from a bigger project. Each module has its own separate function that is interchangeable with other modules.
-
Resource Encapsulation: Encapsulation is an object oriented concept where all data and functions required to use the resource are packaged into a single self-contained component. The goal is to only allow access or manipulation of the resource in the way the designer intended. An example, assume a flag pole is the object. There are fixed methods on how the flag pole is to be used. Put the flag on, take the flag off, raise or lower the flag. Nothing else can be done to the flag pole.
-
Simplicity: Simplicity allows a person to better understand hardware and software. Without the clutter of unnecessarily complicated code and interfaces, the software will be more understandable by people that will update the code when requirements change. It will be easier to understand by the testers and they will be able to spot problems sooner. By keeping software as simple and as focused as possible, the reliability and security is greatly increased.
Introduction
In this module, you will learn how to build a server of your own and connect it up to Littlebits.
Goals
By the end of this tutorial, you will be able to:
- Build and deploy a
Djangoserver into acontainer - Create a
REST endpointon theapplication server - Connect your server to Littlebits to signal your
cloudbitto turn on
Materials Required
For this lesson, you will need:
- PC
- Internet connection
- Littlebits cloud bit and API Key
- Littlebits sensor and actuator
Prerequisite lessons
You should complete the following lessons before attempting this lesson.
- Intro to Components using Littlebits Droids
- Web Services and IoT using Littlebits and IFTTT
- Understanding REST and APIs
- Containers
Table of Contents
- [Cybersecurity First Principles in this lesson](#cybersecurity-first-principles-in-this-lesson)
- [Introduction](#introduction)
- [Goals](#goals)
- [Materials Required](#materials-required)
- [Prerequisite lessons](#prerequisite-lessons)
- [Table of Contents](#table-of-contents)
- [Step 1: Review - Where are we so far?](#step-1-review---where-are-we-so-far)
- [Step 2: No, you won't be starting from scratch](#step-2-no-you-wont-be-starting-from-scratch)
- [Step 3: Setup the server](#step-3-setup-the-server)
- [Step 4: Run the server](#step-4-run-the-server)
- [Step 5: Explore the server](#step-5-explore-the-server)
- [Step 6: Press the button](#step-6-press-the-button)
- [Step 7: Chrome Dev Tools - Your new best friend](#step-7-chrome-dev-tools---your-new-best-friend)
- [Step 8: Make a new REST endpoint to make the client button work with the backend](#step-8-make-a-new-rest-endpoint-to-make-the-client-button-work-with-the-backend)
- [Step 9: Get events from Littlebits](#step-9-get-events-from-littlebits)
- [Step 10: Profit!](#step-10-profit)
- [Checkpoint](#checkpoint-1)
- [Additional Resources](#additional-resources)
- [Acknowledgements](#acknowledgements)
- [License](#license)
Step 1: Review - Where are we so far?
Before we get started, let’s talk about what we’ve done so far. First, we looked at Littlebits and saw that we could plug and play the parts together to create new inventions. We wired these up and hooked them to IFTTT to let the web control our cloudbit. Then, in the REST lesson, we looked behind-the-scenes to see how web services like IFTTT and Littlebits actually work. We played around with POSTMAN and interacted with the Littlebits API.
The last thing we left off with was hooking the Littlebits API up to our own server (instead of IFTTT) so we could make our own home-automation controller Dashboard. We saw how containers could be used to host isolated servers on another host machine.
Now, in this lesson, we will examine how to create our own server and deploy it in a container.
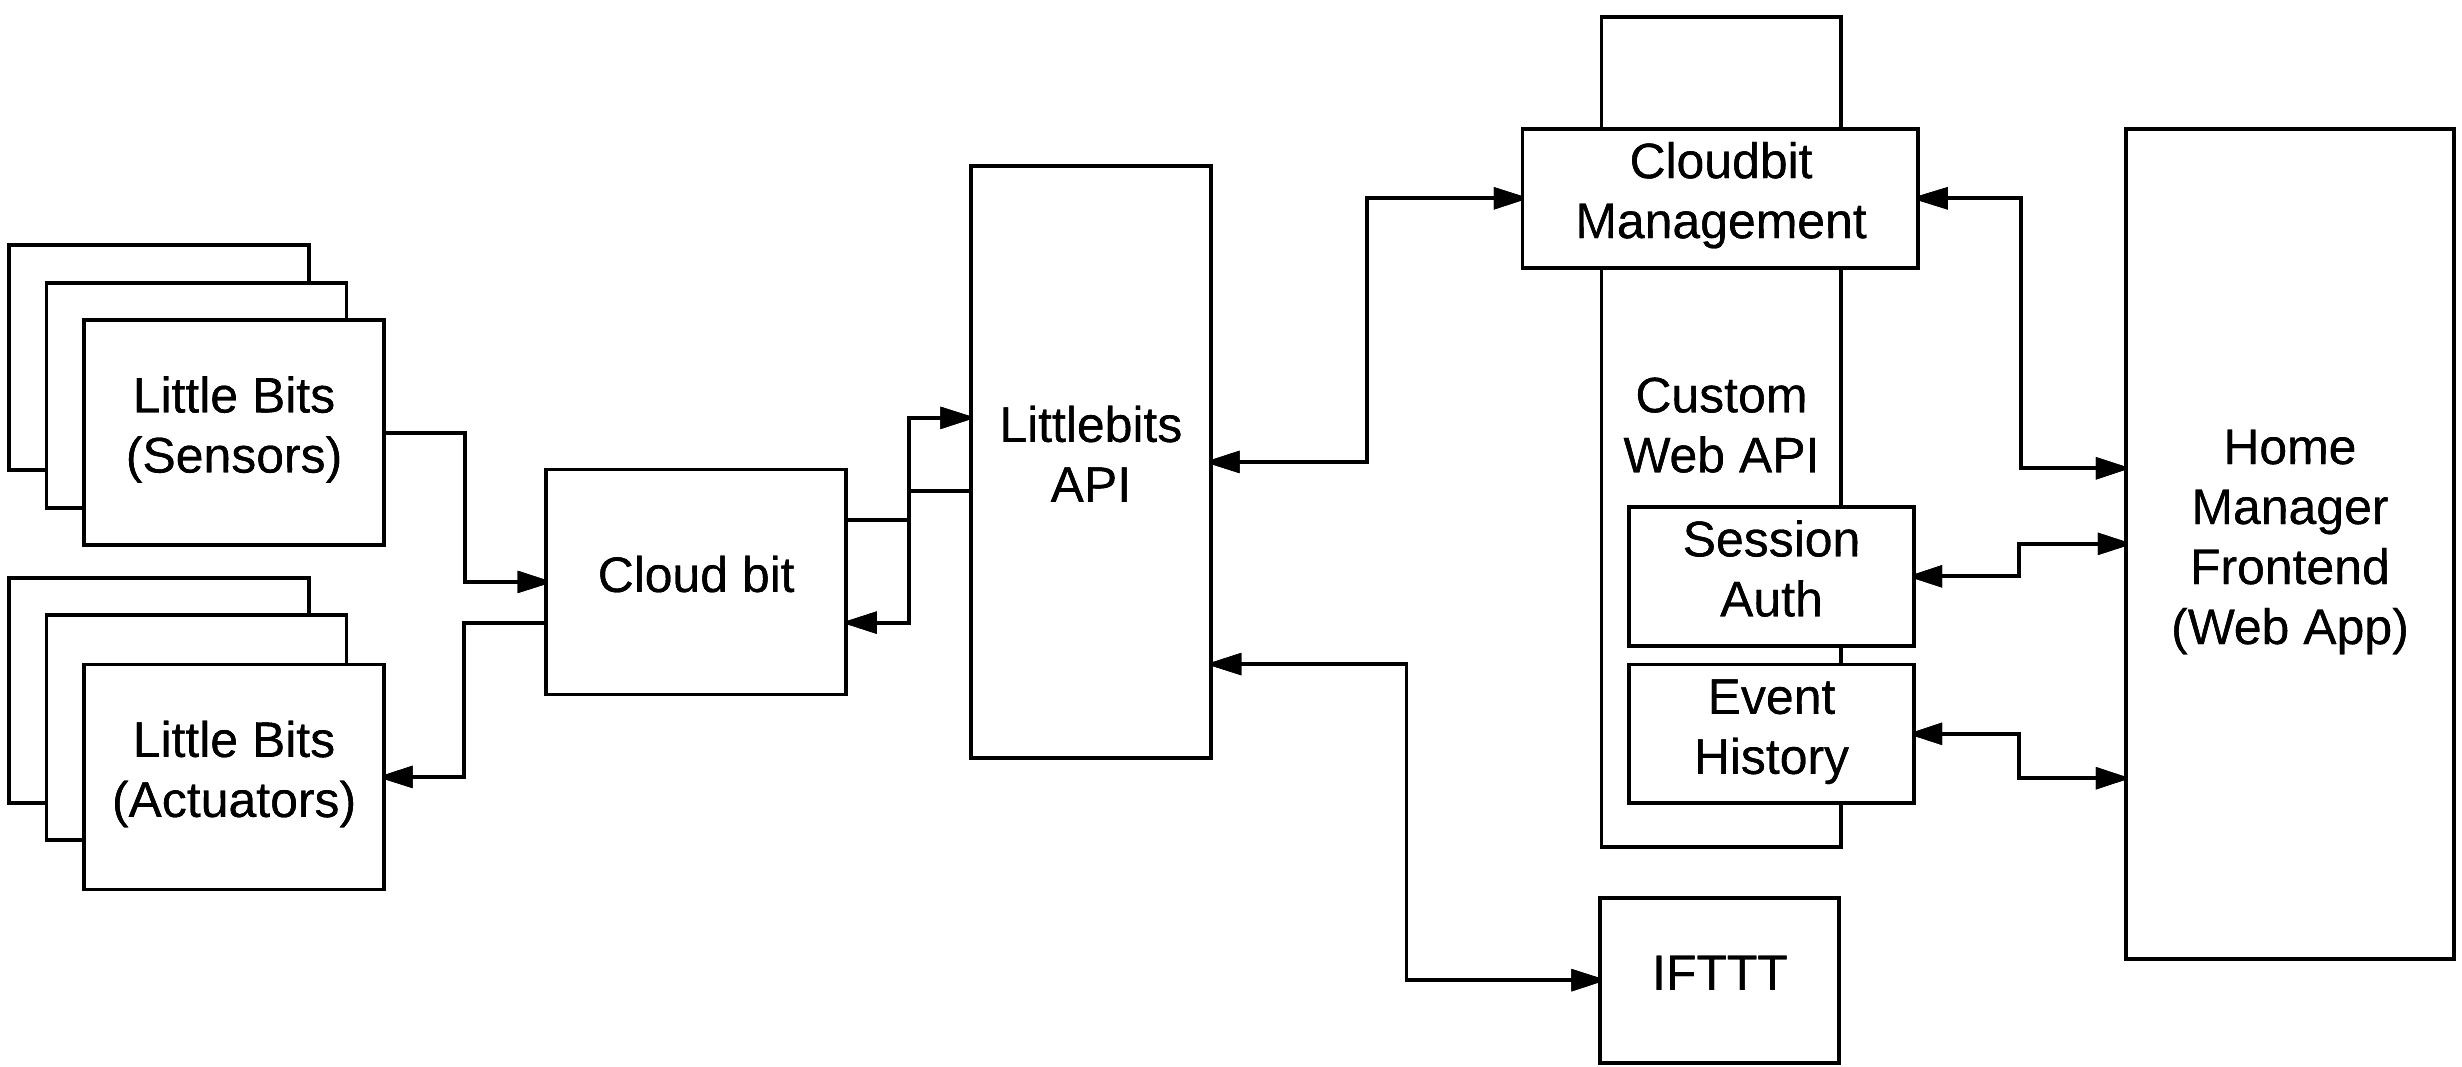
For reference, this is the overall design we are looking at. On the left side, you have Littlebits and the Littlebits API. We previously worked with the API using IFTTT. In the container lesson, you saw how we can setup a new standalone server. In this lesson, we will begin building the item marked custom web API in the figure below. It will have features to support authentication, managing our cloudbit, and logging events.
Step 2: No, you won’t be starting from scratch
The process of creating a new application server from the ground up takes some time and attention. Instead of having you start from the ground up, we are providing you with some starter skeleton code. This code does the basics of accepting requests and storing data that comes in. Instead of building it, we will look at and examine how it operates before modifying it to make it more secure.
- First,
forkour repo by visiting the https://github.com/MLHale/nebraska-gencyber-dev-env and clicking ‘fork’. This will copy the code from our repository into your GitHub account - so you can track your changes as you go. - Since this project includes a
submoduleyou need to fork it as well. Visit https://github.com/MLHale/littlebits-rest-api and clickfork. - Let’s get started locally on your machine by changing into the Desktop directory and then using
gitto clone the skeleton code repository and get it in onto our local machine.
Open a new `Powershell terminal instance:
cd Desktop
git clone https://github.com/<your-github-id without the brackets>/nebraska-gencyber-dev-env
cd nebraska-gencyber-dev-env/
Add the folder to your Atom workspace.
Open the .gitmodules file. Edit the backend submodule to point to your forked copy, instead of the base repo.
[submodule "backend"]
	path = backend
	url = https://github.com/MLHale/littlebits-rest-api
[submodule "frontend"]
	path = frontend
	url = https://github.com/MLHale/littlebits-rest-api-frontend
becomes
[submodule "backend"]
	path = backend
	url = https://github.com/<your-github-id without the angled brackets>/littlebits-rest-api
[submodule "frontend"]
	path = frontend
	url = https://github.com/MLHale/littlebits-rest-api-frontend
This command tells git to use the new url as the path for the submodule. To pull down the code run the following (in the terminal):
git submodule sync
git submodule update --init --recursive --remote
cd backend/
git checkout tags/server-lesson-start
git checkout -b my-server-work
git push --set-upstream origin my-server-work
cd ..
git add -A
git commit -m "updated to forked submodule repository"
git push
This should check out the code for the start of this lesson and create a new branch called my-server-work. It also updates the nebraska-gencyber-dev-env repository you forked to include the correct pointer to the newly forked submodule. You should also see your file tree in Atom update. Any new updates you make you can always run the commands git add, git commit, and git push to save your changes in the branch to your remote repo.
For now, we have our code ready.
Now use docker to build the image that our container will use:
docker-compose build
With this, we should be able to type the following and see our new image.
docker images
It will be called something like nebraskagencyberdevenv_django.
Step 3: Setup the server
This server is completely new, so we need to do some setup to get it initially configured. Execute the following to run the server and open up a bash terminal to interact with it.
docker-compose run django bash
In this terminal that opens in the container, we need to tell our Django server to set up the database and create a new user account for us. The first two lines below set up the database by creating a database Schema that our SQL server can use to store data. The third line creates a new superuser account. Specify a password for admin. In development, you can use something simple (e.g. admin1234) for simplicity. In practice, you would want to use a much more secure password - since the server could be accessed from the wider internet.
python manage.py makemigrations
python manage.py migrate
python manage.py createsuperuser --username admin --email admin
exit
- Now open
Atomon your desktop, - go to the File -> “Add Project Folder…”
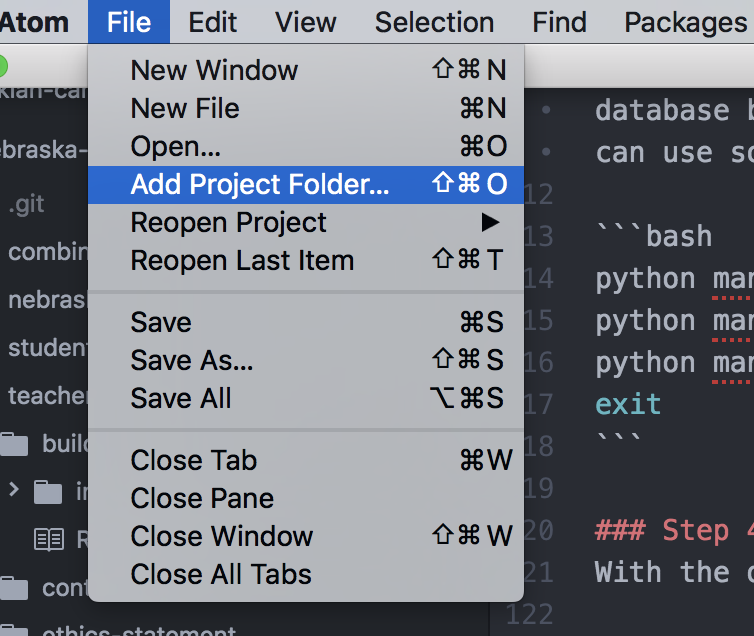
note that your interface may look slightly different on windows.
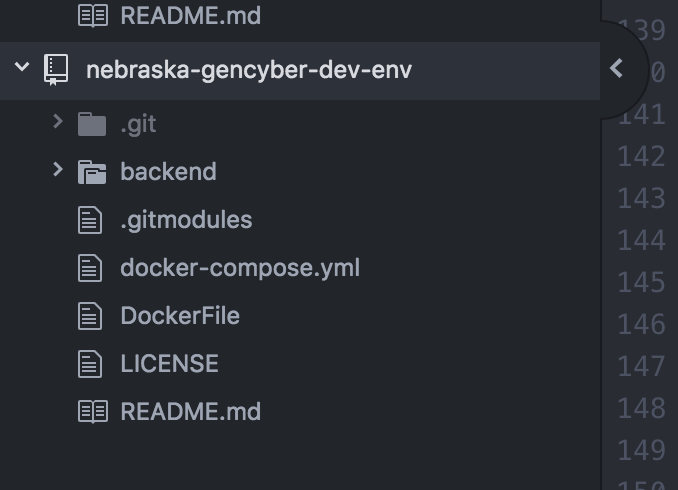
- Find your
nebraska-gencyber-dev-envfolder (it should be located atC:/Users/student/Desktop/) - Upon opening it you should see:
Now, in Atom, open the /nebraska-gencyber-dev-env/backend/django_backend/settings.py file by navigating to it in the file tree (on the left) and clicking it.
find the line marked:
ALLOWED_HOSTS = ['137.48.185.230', 'localhost']
Replace ‘137.48.185.230’ with your ip address.
- to get your server ip, you need to open a
Powershelland type:ipconfig --all - find your ipv4 address on the ip record for the ethernet card attached to your machine
- alternatively, you can go to http://google.com and search for ‘my ip address’
Step 4: Run the server
With the database initialized, you should be able to easily run the app. All you need to do is:
docker-compose up
This server diagrammatically looks like:
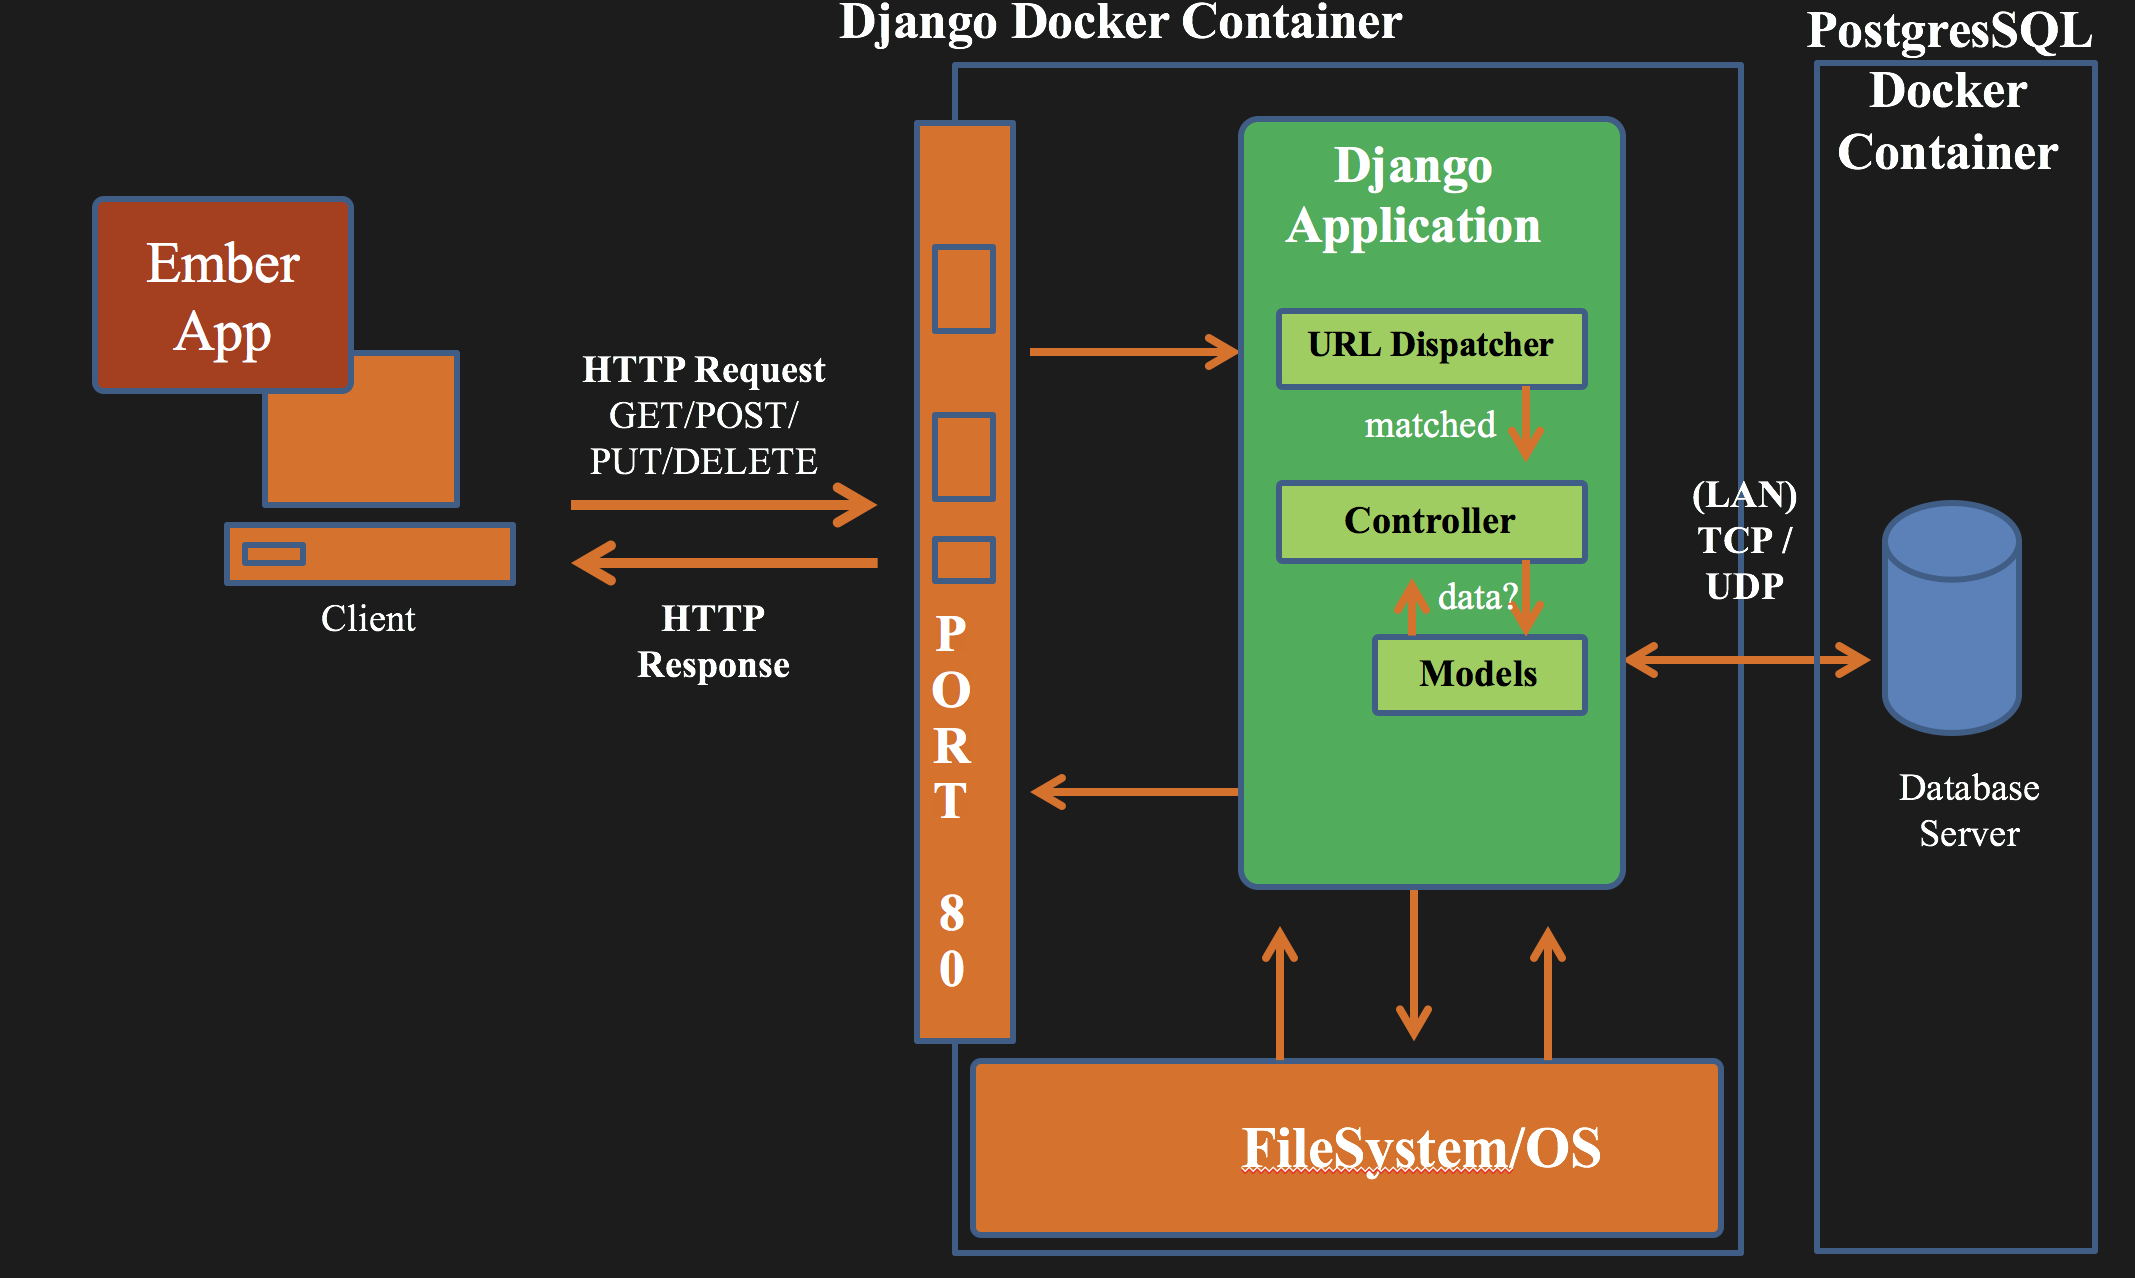
The docker command executes the container using the docker-compose.yml file located in your /nebraska-gencyber-dev-env/ folder.
- Leave this terminal running
- It works by mapping
port 80on thehosttoport 8000in the container. - Inside the container, Django executes its
runserverutility - which works like a web server. - There is also a second container that starts up and runs our
postgresdatabase server. - You can take a look at the
Dockerfilein your/nebraska-gencyber-dev-env/folder to learn more about what happens behind the scenes.
With the server running, you should be able to visit http://localhost to see your server. You should an interface that looks something like the following.
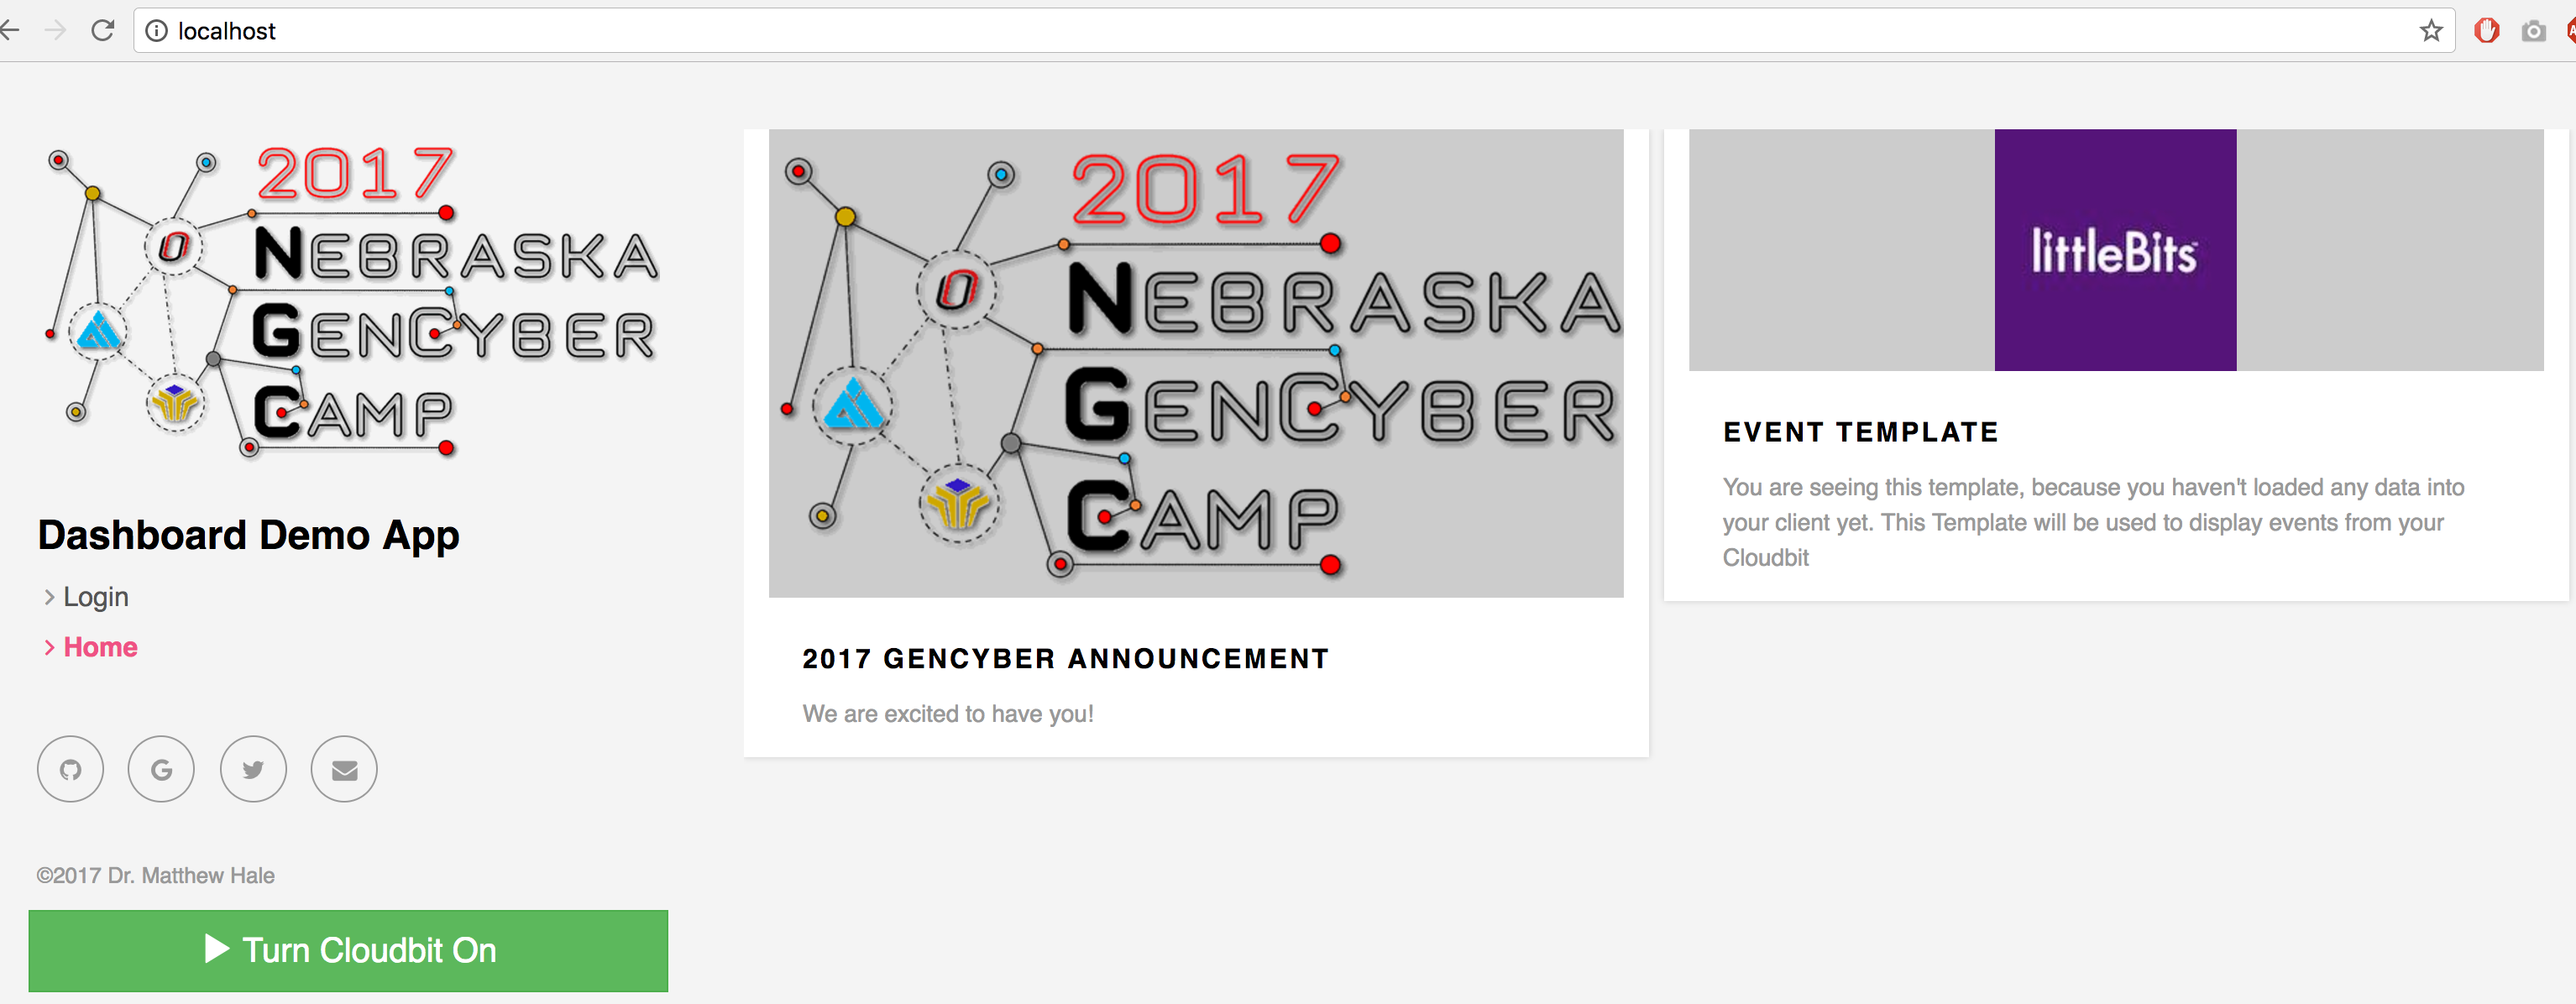
This is a web client (also called a frontend) that we’ve built for demo purposes to work with our server. You will be making the server work better with the client.
Step 5: Explore the server
Since our focus is the backend - let’s take a look at our server environment. First. Let’s explore the file tree.
- click
backendin the file tree to explore the actual files our server is using - Click
apianddjango_backendto expand out the folders and see what we have. - This code is built using a
Model View Controllerframework calledDjango.Models(inmodels.py) areabstractionmechanisms that help you represent your data without worrying about the nitty gritty of database technologies.Controllers(incontrollers.py) andViewsare modularization mechanisms that separate user-facing code (like user interfaces) from backend code that handles number crunching and getting data to the views.
- Look over these three files, first
models.py, thenurls.py, thencontrollers.py
Models.py
- In
models.pyyou will see that we have defined twomodelsDeviceandDeviceEvent. Both of these areschemathat have fields in them for each of the types of data they hold. - In our
Devicemodel we have fields for theownerand thedeviceid. This model will hold data about our cloudbit so that our backend server can make use of it.
class Device(models.Model):
    owner = models.CharField(max_length=1000, blank=False)
    deviceid = models.CharField(max_length=1000, blank=False)

    def __str__(self):
        return str(self.deviceid)

    class JSONAPIMeta:
        resource_name = "devices"
- In the
DeviceEventmodel we have fields for:device(i.e. the cloudbit the device event was created for),- the
eventtypewhich describes what occurred, - the
powerwhich identifies the power level on the device when the event occurred timestamp(when it happened)useridwhich is the Littlebits id of the user- and
requestorwhich logs the IP of the Littlebits server that sent the message
class DeviceEvent(models.Model):
    device = models.ForeignKey(Device, on_delete=models.CASCADE, related_name='events')
    eventtype = models.CharField(max_length=1000, blank=False)
    power = models.IntegerField()
    timestamp = models.DateTimeField()
    userid = models.CharField(max_length=1000, blank=True, unique=True)
    requestor = models.GenericIPAddressField(blank=False)

    def __str__(self):
        return str(self.eventtype) + str(self.device)
- Both of the models also include a
__str__function which outputs a string if the model is converted to a string.
urls.py
Next lets look at urls.py. This file tells Django which URLs are accessible on the server. If a URL entry isn’t included in a urls.py file, then the method cannot be accessed.
- The important part of this file, below, identifies all of the
url patternsthat are acceptable forDjangoto server up to any would-be requestors - Each is a regular expression.
- Each maps to a function in the
controllers.pyfile. Basically, when someone attempts to visit a URL, Django goes through its list of acceptable patterns. If it matches a pattern it executes the corresponding code in that method. If it doesn’t match any acceptable pattern, it gives the user anHTTP 404error (not found). - in this case,
api/urls.pyis a sub set of patterns that are mapped behind/api/as given in the filedjango_backend/urls.py.
api/urls.py
urlpatterns = [
    url(r'^session/', controllers.Session.as_view()),
    url(r'^register', csrf_exempt(controllers.Register.as_view())),
    url(r'^deviceevents', csrf_exempt(controllers.DeviceEvents.as_view())),
    url(r'^', include(router.urls)),
]
django_backend/urls.py
urlpatterns = [
    url(r'^admin/', admin.site.urls),
    url(r'^api-auth/', include('rest_framework.urls', namespace='rest_framework')),
    url(r'^api/', include(api_urls)),
    url(r'^css-example/', controllers.css_example),
    url(r'^', views.home),
]
Controllers.py
Next, lets look at the controllers.py file to see what the server does when a URL is visited.
There is a lot of code in this file. Let’s look at the function that handles requests to the /api/deviceevents URL.
- Find the code below.
- Notice that this is a
classthat extends the Django REST classAPIView. - An
APIViewallows you to define functions that handleGET(single),GET(list),POST,PUT, andDELETErequests that might arrive at/api/deviceevents - The
GET(single) request is used whenever a user wants to get a single item (typically by id), something like/api/deviceevents/4would return the event with id 4. - The
GET(list) request is used whenever a user wants to get all of the events. - The
POSTrequest is used whenever a user wants to make a new event. - The
PUTrequest is used whenever a user wants to modify an existing event. - Finally, the
DELETErequest is used whenever a user wants to delete an existing event.
These conventions are not specific to
Djangothey are based onRESTful APIdesign standards.
-
In our
APIViewwe have created twoREST endpointsfor handlingPOSTrequests andGET(list) requests. - The
postfunction looks at the incoming request, - extracts the data fields from it,
- gets the stored
Devicerecord (if one exists) or creates a newDevicerecord (if one does not exist), -
and then creates and stores a new
DeviceEventrecord based on the incoming request data - The
getfunction simply queries the database for allDeviceEventobjects and returns them to the requestor inJSONformat
class DeviceEvents(APIView):
    permission_classes = (AllowAny,)
    parser_classes = (parsers.JSONParser,parsers.FormParser)
    renderer_classes = (renderers.JSONRenderer, )

    def post(self, request, *args, **kwargs):
        json_req = json.loads(request.POST.get('request'))

        eventtype = json_req.get('payload').get('delta')
        power = json_req.get('payload').get('percent')
        timestamp = json_req.get('timestamp')
        userid = json_req.get('user_id')
        requestor = request.META['REMOTE_ADDR']

        try:
            device = Device.objects.get(deviceid=json_req.get('bit_id'))
        except Device.DoesNotExist:
            #device not created - Create it
            device = Device(
                deviceid=json_req.get('bit_id'),
                owner=userid
            )
            device.save()

        newEvent = DeviceEvent(
            device=device,
            eventtype=eventtype,
            power=power,
            timestamp=datetime.datetime.fromtimestamp(timestamp/1000, pytz.utc),
            userid=userid,
            requestor=requestor
        )

        try:
            newEvent.clean_fields()
        except ValidationError as e:
            print e
            return Response({'success':False, 'error':e}, status=status.HTTP_400_BAD_REQUEST)

        newEvent.save()
        print 'New Event Logged from: ' + json_req.get('bit_id')
        print json_req.get('payload')
        return Response({'success': True}, status=status.HTTP_200_OK)

    def get(self, request, format=None):
        events = DeviceEvent.objects.all()
        json_data = serializers.serialize('json', events)
        content = {'deviceevents': json_data}
        return Response(content)
Checkpoint
- Is the URL
<myserver>/api/deviceeventsa valid URL? - Is the URL
<myserver>/api/sessiona valid URL? - What function gets called when the user visits
<myserver>/api/register? - What would be the result of making a
DELETErequest to<myserver>/api/deviceevents? - What would be the result of making a
POSTrequest to<myserver>/api/deviceevents?
Step 6: Press the button
Ok, so you now have a loose familiarity with the skeleton backend code that was provided to you. Let’s build upon it.
When you log in, you should see a green button that says turn cloudbit on when visiting localhost. Time to push it!
- connect the
power moduleto the pinkbuttoninput module - connect the
buttonmodule to thecloudbitmodule -
connect the
cloudbitmodule to theLEDmodule - in your browser, go to http://localhost
- press the button
- what happened?
- How can we tell?
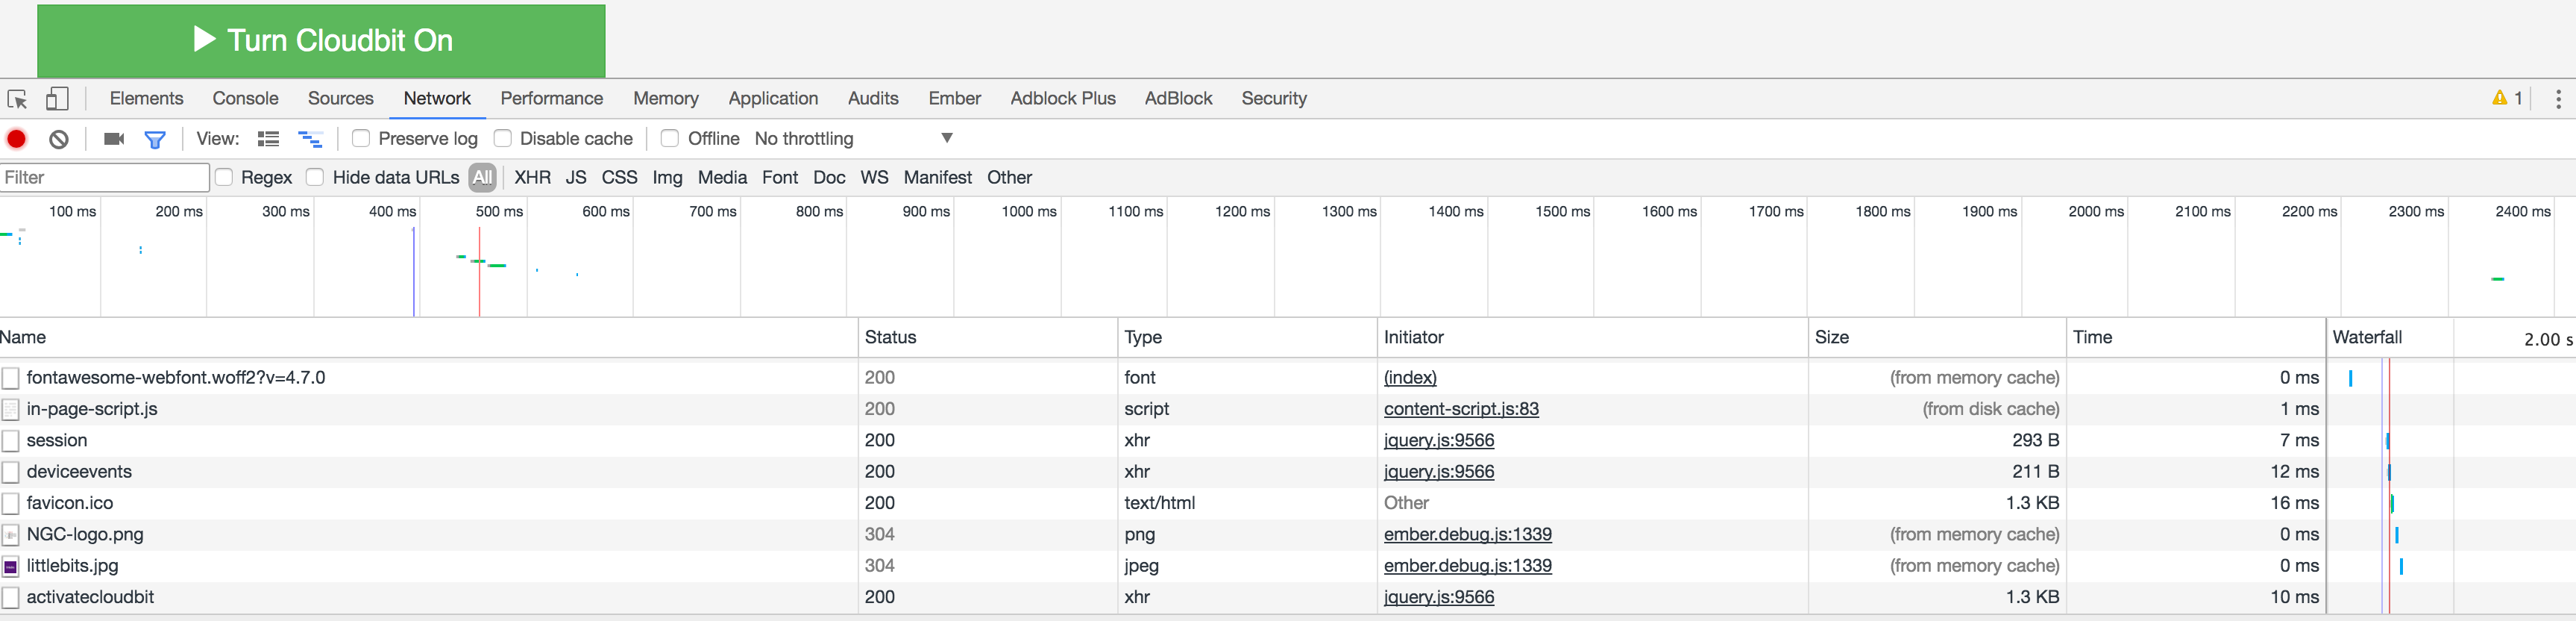
Lets use the chrome development tools to take a closer look.
- Press F12 (windows) or Right Click on the page -> Select
Inspect - This will bring up the
chrome development toolswhich have a number of very helpful capabilities for debugging websites and inspecting the behind-the-scenes action that happens when you interact with web content
Step 7: Chrome Dev Tools - Your new best friend
Instead of me reinventing the wheel, head over to https://developers.google.com/web/tools/chrome-devtools/ to learn the basics of what Chrome Development tools can do.
When you’ve looked over the different features. Come back and click on the network tab to inspect what is happening with our button.
You should see:
If you click on activatecloudbit you will see the exact request that is getting sent.
If you click over to the response tab you will see the raw HTML that the server is returning when this button is clicked.
Step 8: Make a new REST endpoint to make the client button work with the backend
Currently, the server doesn’t know that it needs to do anything special with the URL /api/activatecloudbit so it is just rendering the home page (what we have been looking at this whole time) in response. What we need is for our server to recognize that a new event has occurred from the client and then do something to handle it, in this case, contact the Littlebits API.
For this to work, we need to create a new REST Endpoint controller to handle the request. Open up your controllers.py file and add a new entry called ActivateCloudbit. This entry will only expose a POST endpoint. The goal is to:
- capture the info from the client
- Talk to
Littlebits APIto retrieve the device info for the current user - Use the retrieved device info to craft a
requestto turn on theCloudbit - Turn on the cloudbit and log the resulting event locally
class ActivateCloudbit(APIView):
    permission_classes = (AllowAny,)
    parser_classes = (parsers.JSONParser,parsers.FormParser)
    renderer_classes = (renderers.JSONRenderer, )

    def post(self,request):
        print 'REQUEST DATA'
        print str(request.data)

        eventtype = request.data.get('eventtype')
        timestamp = int(request.data.get('timestamp'))
        requestor = request.META['REMOTE_ADDR']
        api_key = ApiKey.objects.all().first()

        #get device info from Littlebits API
        r = requests.get('https://api-http.littlebitscloud.cc/v2/devices/', headers= {
            'Authorization' : 'Bearer ' + api_key.key
        })
        print 'Retrieving List of Devices from Littlebits:'
        print r.json()
        userid = r.json()[0].get('user_id')
        deviceid= r.json()[0].get('id')

        try:
            device = Device.objects.get(deviceid=deviceid)
        except Device.DoesNotExist:
            #device not created - Create it
            device = Device(
                deviceid=deviceid,
                owner=userid
            )
            device.save()

        print "Creating New event"

        newEvent = DeviceEvent(
            device=device,
            eventtype=eventtype,
            power=-1,
            timestamp=datetime.datetime.fromtimestamp(timestamp/1000, pytz.utc),
            userid=userid,
            requestor=requestor
        )

        print newEvent
        print "Sending Device Event to: " + str(deviceid)

        #send the new event (to turn on the device) to littlebits API
        event_req = requests.post('https://api-http.littlebitscloud.cc/v2/devices/'+deviceid+'/output', headers= {
            'Authorization' : 'Bearer ' + api_key.key
        })
        print event_req.json()

        #check to ensure the device was on and received the event
        if (event_req.json().get('success')!='true'):
            return Response({'success':False, 'error':event_req.json().get('message')}, status=status.HTTP_503_SERVICE_UNAVAILABLE)

        #check that the event is safe to store in the databse
        try:
            newEvent.clean_fields()
        except ValidationError as e:
            print e
            return Response({'success':False, 'error':e}, status=status.HTTP_400_BAD_REQUEST)

        #log the event in the DB
        newEvent.save()
        print 'New Event Logged'
        return Response({'success': True}, status=status.HTTP_200_OK)
Now that we have the endpoint defined we need to make it available on the web server. Modify api/urls.py to include a new line in the urlpatterns:
urlpatterns = [
  url(r'^activatecloudbit', csrf_exempt(controllers.ActivateCloudbit.as_view())),
  ...other stuff...
]
Note: don’t include the …other stuff… portion.
This will make the endpoint available on the webserver. Now go back to http://localhost and try to click the button. What happens?
Did you get an error?

This is because we haven’t added our API Key to our server, so the field api_key = ApiKey.objects.all().first() returns null (or NoneType). To fix this, open your browser and go to http://localhost/admin/api/apikey/. Click ‘add api key’.

Then enter your username (probably admin) in the owner field. In the key field add in your Littlebits API key used in the previous lesson (without the word Bearer). If you forgot it or don’t have it handy, you can retrieve it here by visiting http://control.littlebitscloud.cc/ and clicking on settings. When added, save the key.
Since you made some changes to your code repository, lets track the changes with git:
in a terminal change directory in the the /nebraska-gencyber-dev-env folder and execute the following:
git status
git add -A
git status
git commit -m "added activatecloudbit code"
git push
You just pushed your local changes to remote on github!
Stray observations
- Our new endpoint is a
modulethat exemplifies themodularizationCybersecurity First Principle. It doesn’t rely on the other modules (endpoints). - We did not hardcode our
API keyin the code to protect it from static lookup - this is an example of theinformation hidingCybersecurity First Principle. - We made use of
abstractionandresource encapsulationas they relate to the API design for our server and for theLittlebits API
Step 9: Get events from Littlebits
The next step is to not only send events to Littlebits, but also to subscribe to and receive events that are output from the cloudbit. To do that, we need to use POSTMAN to add a subscriber. This was the last step where we left off in the REST API tutorial. Now we are ready!
Lets add a subscriber to catch input events going to the cloudbit:
- make a POST request, using
POSTMANto https://api-http.littlebitscloud.cc/v2/subscriptions - In our case we want to make a server listen for the
cloudbit, so lets use a URI endpoint as the subscriber - Make sure you use the same headers that you used in the
RESTtutorial. If you don’t remember it should be:
headers:
{
    "Authorization": "Bearer <your api key here without the angled brackets>",
  "Content-type": "application/json"
}
This time, in the body, we are going to use:
body:
{
    "publisher_id": "<your device id without the angled brackets>",
    "subscriber_id": "http://gencyber2017.unomaha.edu/api/proxy/<your-server-ip without the angled brackets>/api/deviceevents",
  "publisher_events": ["amplitude:delta:ignite"]
}
- to get your server ip, you need to open a
Powershelland type:ipconfig --all - find your ipv4 address on the ethernet card attached to your machine
- alternatively, you can go to http://google.com and search for ‘my ip address’
- put the ip in the body of the request above and send the message to the
Littlebits API - If the request works, you should see your request echoed back to you
Stray observations
- We are using http://gencyber2017.unomaha.edu/api/proxy so the requests from Littlebits can make it to your servers in this room.
- UNO, like other universities and companies, uses a
defense in depthstrategy that includesperimeter network firewalls. This is an example oflayering. In this case, we are filtering external requests through a proxy to check their conformity. If they are clean, they are forwarded through our network firewall to your individual servers. - The
publisher_eventsfield allows you to subscribe to several different types of events. You can find a full list here: http://developers.littlebitscloud.cc/#create-subscription - Please do not denial of service the proxy portal - your IP might get automatically banned if you do.
Step 10: Profit!
Pretty neat. Observe your handy work.
- connect the
power moduleto the pinkbuttoninput module - connect the
buttonmodule to thecloudbitmodule - connect the
cloudbitmodule to theLEDmodule
Now, press the button on button module. Watch as your server get the events from the Littlebits API, logs them locally (creating a database record), stores them for later, and then loads them into the client app for you to see.
Note: the client is designed to check for updates every 3 seconds.
Checkpoint
Lets review what we’ve learned.
https://www.qzzr.com/c/quiz/435902/custom-server-development
Additional Resources
For more information, investigate the following.
- http://developers.littlebitscloud.cc/ - API reference for the Littlebits web service.
- https://developers.google.com/web/tools/chrome-devtools/ - Chrome Dev Tools overview
Checkpointed code
If you want to fast forward between lessons, I have provided you with a complete solution through step 10 of this lesson. You can update to that version using the following command from the terminal where your nebraska-gencyber-dev-env is running:
git checkout tags/step10-server
This will update your local code copy to the tagged release version. You can merge it back into your master branch by making a pull request into your master branch using Github.
Acknowledgements
Special thanks to Dr. Robin Gandhi, Andrew Li, and April Guerin for reviewing and editing this module.
License
Nebraska GenCyber 
is licensed under a Creative Commons Attribution-NonCommercial-ShareAlike 4.0 International License.
Overall content: Copyright (C) 2017-2018 Dr. Matthew L. Hale, Dr. Robin Gandhi, Dr. Briana B. Morrison, and Doug Rausch.
Lesson content: Copyright (C) Dr. Matthew Hale 2017-2018.
This lesson is licensed by the author under a Creative Commons Attribution-NonCommercial-ShareAlike 4.0 International License.