Understanding REST and APIs
Cybersecurity First Principles in this lesson
-
Abstraction: An abstraction is a representation of an object or concept. It could be something such as a door, a speedometer, or a data structure in computer science. Abstraction decouples the design from the implementation. The gauges in an automobile are an abstraction of the performance of a car. A map is an abstraction of the earth.
-
Data Hiding: Data hiding is the technique that does not allow certain aspects of an object to be observed or accessed. Data and information hiding keeps the programmer from having complete access to data structures. It allows access to only what is necessary.
-
Layering: Cyber security uses multiple layers of defense or protecting information. If one layer is defeated the next layer should catch it.
-
Least Privilege: One of the ways to protect information is by limiting what people can see and do with your information and resources. The principle of least privilege says to allow the minimum number of privileges necessary to accomplish the task.
-
Minimization: Minimization refers to having the least functionality necessary in a program or device. The goal of minimization is to simplify and decrease the number of ways that software can be exploited. This can include turning off ports that are not needed, reducing the amount of code running on a machine, and/or turning off unneeded features in an application.
-
Modularization: The concept of modularity is like building blocks. Each block (or module) can be put in or taken out from a bigger project. Each module has its own separate function that is interchangeable with other modules.
-
Resource Encapsulation: Encapsulation is an object oriented concept where all data and functions required to use the resource are packaged into a single self-contained component. The goal is to only allow access or manipulation of the resource in the way the designer intended. An example, assume a flag pole is the object. There are fixed methods on how the flag pole is to be used. Put the flag on, take the flag off, raise or lower the flag. Nothing else can be done to the flag pole.
-
Simplicity: Simplicity allows a person to better understand hardware and software. Without the clutter of unnecessarily complicated code and interfaces, the software will be more understandable by people that will update the code when requirements change. It will be easier to understand by the testers and they will be able to spot problems sooner. By keeping software as simple and as focused as possible, the reliability and security is greatly increased.
Introduction
In this module, you will learn what a RESTful API is, how Littlebits uses APIs to monitor and issue commands to the cloudbit, and how you can use the Littlebits API yourself.
Goals
By the end of this tutorial, you will be able to:
- Define
REST,an endpoint,API Integration, andAPI Invocation - Use a REST Client to make
POSTandGETrequests to anAPI - Using manual requests to
mashupweb services
Materials Required
For this lesson, you will need:
- PC
- Internet connection
- Little bits cloud bit and API Key
- Little bits sensor and actuator
Prerequisite lessons
You should complete the Intro to components using Littlebits Droids and Web services and IoT using Littlebits and IFTTT lessons before attempting this lesson.
Table of Contents
- Step 1: Background
- Step 2: Ok, lets take a look at a real API
- Step 3: Getting our API Key
- Step 4: Making your first REST request
- Step 5: GET device info
- Step 6: First POST request to turn the device on
- Exercise
- Checkpoint
- Additional Resources
- Lead Author
Step 1: Background
Before we get started, lets talk about what an API is.
This background text and its associated images are modified for this setting by Matt Hale. Modifications are licensed under creative commons share-alike. The original material it is based upon was created by the Mozilla foundation and its contributors. Credit: https://developer.mozilla.org/en-US/docs/Web/HTTP/Overview https://developer.mozilla.org/en-US/docs/Web/HTTP/Messages
HTTP is a protocol which allows the fetching of resources, such as HTML documents. It is the foundation of any data exchange on the Web and a client-server protocol, which means requests are initiated by the recipient, usually the Web browser. A complete document is reconstructed from the different sub-documents fetched, for instance text, layout description, images, videos, scripts, and more.

Clients and servers communicate by exchanging individual messages (as opposed to a stream of data). The messages sent by the client, usually a Web browser, are called requests and the messages sent by the server as an answer are called responses.
 Designed in the early 1990s, HTTP is an extensible protocol which has evolved over time. It is an application layer protocol that is sent over
 TCP, or over a TLS-encrypted TCP connection, though any reliable transport protocol could theoretically be used. Due to its extensibility, it is used to not only fetch hypertext documents, but also images and videos or to post content to servers, like with HTML form results. HTTP can also be used to fetch parts of documents to update Web pages on demand.
HTTP Messages
HTTP messages are composed of textual information encoded in ASCII, and span over multiple lines. In HTTP/1.1, and earlier versions of the protocol, these messages were openly sent across the connection. In HTTP/2, the once human-readable message is now divided up into HTTP frames, providing optimization and performance improvements.
Web developers, or webmasters, rarely craft these textual HTTP messages themselves: software, a Web browser, proxy, or Web server, perform this action. They provide HTTP messages through config files (for proxies or servers), APIs (for browsers), or other interfaces.

The HTTP/2 binary framing mechanism has been designed to not require any alteration of the APIs or config files applied: it is broadly transparent to the user.
HTTP requests, and responses, share similar structure and are composed of:
- A
start-linedescribing the requests to be implemented, or its status of whether successful or a failure. This start-line is always a single line. - An optional set of
HTTP headersspecifying the request, or describing the body included in the message. - A blank line indicating all meta-information for the request have been sent.
- An optional
bodycontaining data associated with the request (like content of an HTML form), or the document associated with a response. The presence of the body and its size is specified by the start-line and HTTP headers.
The start-line and HTTP headers of the HTTP message are collectively known as the head of the requests, whereas its payload is known as the body.

HTTP Requests
Start line
HTTP requests are messages sent by the client to initiate an action on the server. Their start-line contain three elements:
- An HTTP Method, a verb (like
GET,PUT,POST, orDELETE) or a noun (likeHEADorOPTIONS), that describes the action to be performed. For example,GETindicates that a resource should be fetched orPOSTmeans that data is pushed to the server (creating or modifying a resource, or generating a temporary document to send back).PUTmodifies an existing resource, whileDELETEremoves one. - The request target, usually a
URL, or the absolute path of the protocol, port, and domain are usually characterized by the request context. The format of this request target varies between different HTTP methods. It can be- An absolute path, ultimately followed by a
'?'and query string. This is the most common form, known as the origin form, and is used withGET,POST,HEAD, andOPTIONSmethods.
POST / HTTP 1.1 GET /background.png HTTP/1.0 HEAD /test.html?query=alibaba HTTP/1.1 OPTIONS /anypage.html HTTP/1.0 - A complete URL, known as the absolute form, is mostly used with
GETwhen connected to a proxy.
GET http://developer.mozilla.org/en-US/docs/Web/HTTP/Messages HTTP/1.1 - The authority component of a URL, consisting of the domain name and optionally the port (prefixed by a
':'), is called the authority form. It is only used withCONNECTwhen setting up an HTTP tunnel.
CONNECT developer.mozilla.org:80 HTTP/1.1 - The asterisk form, a simple asterisk (
'*') is used withOPTIONS, representing the server as a whole.
OPTIONS * HTTP/1.1
- An absolute path, ultimately followed by a
- The HTTP version which defines the structure of the remaining message, acting as an indicator of the expected version to use for the response.
Headers
HTTP headers from a request follow the same basic structure of an HTTP header: a case-insensitive string followed by a colon (':') and a value whose structure depends upon the header. The whole header, including the value, consist of one single line, which can be quite long.
There are numerous request headers available. They can be divided in several groups:
- General headers, like
Via, apply to the message as a whole. - Request headers, like
User-Agent,Accept-Type, modify the request by specifying it further (likeAccept-Language), by giving context (likeReferer), or by conditionally restricting it (likeIf-None). - Entity headers, like
Content-Lengthwhich apply to the body of the request. Obviously there is no such header transmitted if there is no body in the request.

Body
The final part of the request is its body. Not all requests have one: requests fetching resources, like GET, HEAD, DELETE, or OPTIONS, usually don’t need one. Some requests send data to the server in order to update it: as often the case with POST requests (containing HTML form data).
Bodies can be broadly divided into two categories:
- Single-resource bodies, consisting of one single file, defined by the two headers:
Content-TypeandContent-Length. - Multiple-resource bodies, consisting of a
multipart body, each containing a different bit of information. This is typically associated withHTML Forms.
HTTP Responses
Status line
The start line of an HTTP response, called the status line, contains the following information:
- The
protocol version, usuallyHTTP/1.1. - A
status code, indicating success or failure of the request. Common status codes are200(ok),404(Not found), or500(Server error) - A
status text. A brief, purely informational, textual description of the status code to help a human understand the HTTP message.
A typical status line looks like: HTTP/1.1 404 Not Found.
Headers
HTTP headers for responses follow the same structure as any other header: a case-insensitive string followed by a colon (':') and a value whose structure depends upon the type of the header. The whole header, including its value, presents as a single line.

Body
The last part of a response is the body. Not all responses have one: responses with a status code, like 201 or 204, usually don’t.
Bodies can be broadly divided into three categories:
- Single-resource bodies, consisting of a single file of known length, defined by the two headers:
Content-TypeandContent-Length. - Single-resource bodies, consisting of a single file of unknown length, encoded by chunks with
Transfer-Encodingset tochunked. - Multiple-resource bodies, consisting of a multipart body, each containing a different section of information. These are relatively rare.
Step 2: Ok, lets take a look at a real API
Phew, enough background. In the previous lesson, we wired our cloudbit up to the web and explored how we could send it signals using IFTTT. We saw that if our cloudbit detected an input signal (a request), we could have IFTTT do something (send a response). These concepts, i.e. request and response, are central to the concept of RESTful APIs. REST, or REpresentational State Transfer, APIs, or Application Programming Interfaces, are tools that developers use to provide abstraction and resource encapsulation to people who want to interact with their data.
APIs allow you to get and save data back to the application, without needing to tightly integrate with that application. This improves simplicity and helps your code to be more modular. APIs include endpoints, such as /api/events, that allow you to access certain specific data (e.g. events in this example). API endpoints help provide minimization since users can only interact with the application through those interfaces provided by the developer.
…Enough talk! Lets look at an API!
Open Chrome and go to http://developers.littlebitscloud.cc/. You are looking at the cloudbit API. This is what IFTTT uses to handle requests and responses.
You can see that Littlebits tells us all about how to interact with our cloudbit using the API. Lets try it out.
Step 3: Getting our API Key
Secure APIs don’t just accept requests and provide responses to anyone. APIs use a concept called least privilege to allow end-users to only have access to the features they need. Since we own the cloudbit, we should have the ability to do anything we want with it, but we might want to prevent other people from abusing and misusing our cloudbit.
To ensure that only we can program our cloudbit, Littlebits provides something called an API Key. This key is a really long alphanumerical string that would be hard to crack. Lets find our key, so we can issue commands to our cloudbit.
2018 note, for the purposes of our lesson today, you will be using a key I have setup for your use, thus you don’t need to get your own API Key.
Go to http://control.littlebitscloud.cc/
Login using the account you used in the previous lesson
Once logged in, click on your cloudbit:
Now go to the settings menu. You should see your access token API Key, you will need this string in next steps - so keep it handy. In practice, you wouldn’t want to share this with anyone.
Step 4: Making your first REST request
Now that we have our API Key, lets use it to make a request.
POSTMAN is a REST client, that allows end users to make requests to test their APIs. Lets use it to test the cloudbit API. Launch POSTMAN by typing chrome://apps into the Chrome address bar, hit enter, and then click the POSTMAN icon.
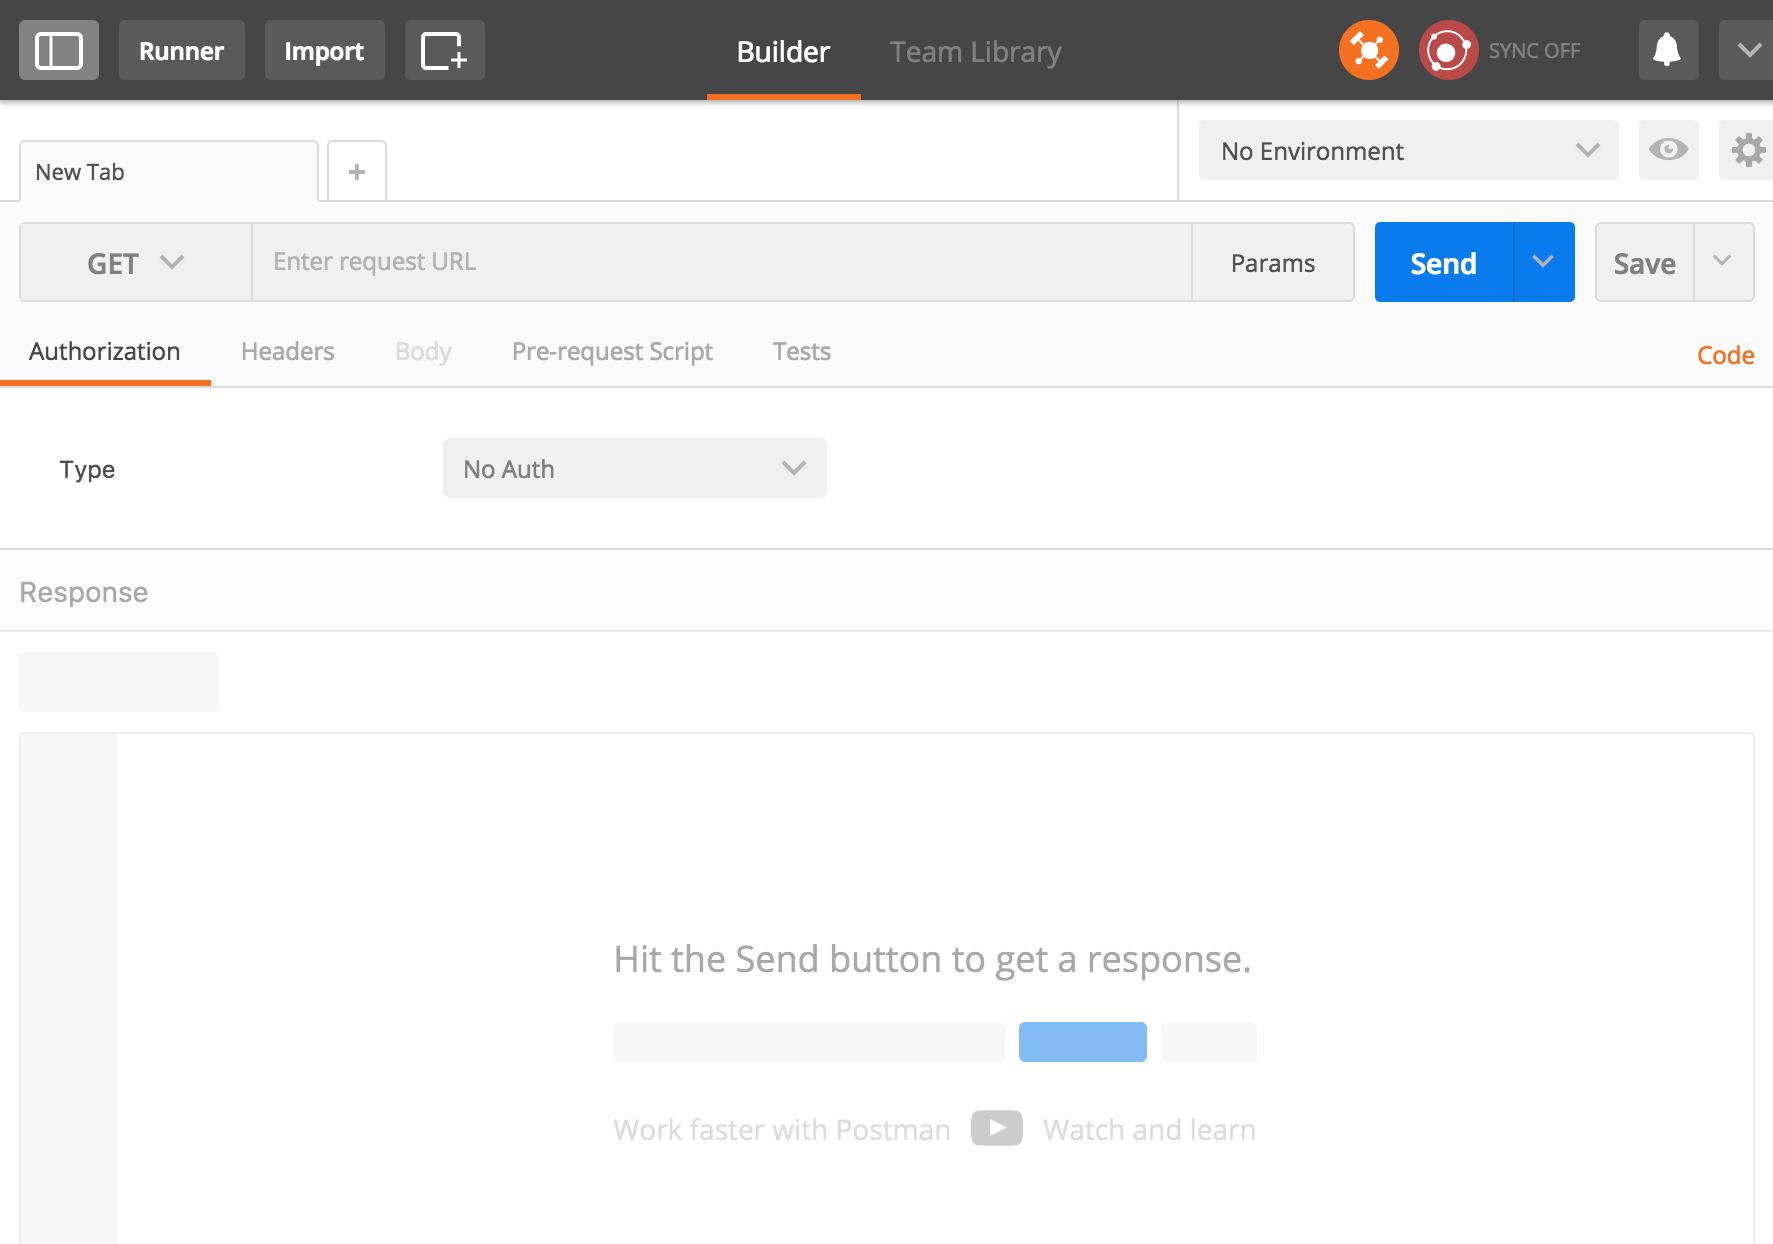
In POSTMAN, lets build a new GET request targeted at the URL https://api-http.littlebitscloud.cc/v2/devices
- Find and click the
headersbutton and add the following
Authorization: Bearer <your access token with no angled brackets>
2018 note, use the following key I have setup for you
Authorization: Bearer 3111600dc0d5bd1f6cd25d39ed11302e182a23dff77d77cc8d79ab6def76fc60
You can add the header as a key value pair, where the key is Authorization and the value is Bearer <insert your access token here, remove the angled brackets>. Make sure to use your access token.
- Hit the
sendbutton to issue the GET request to the URL.
If all goes well you should see something like:
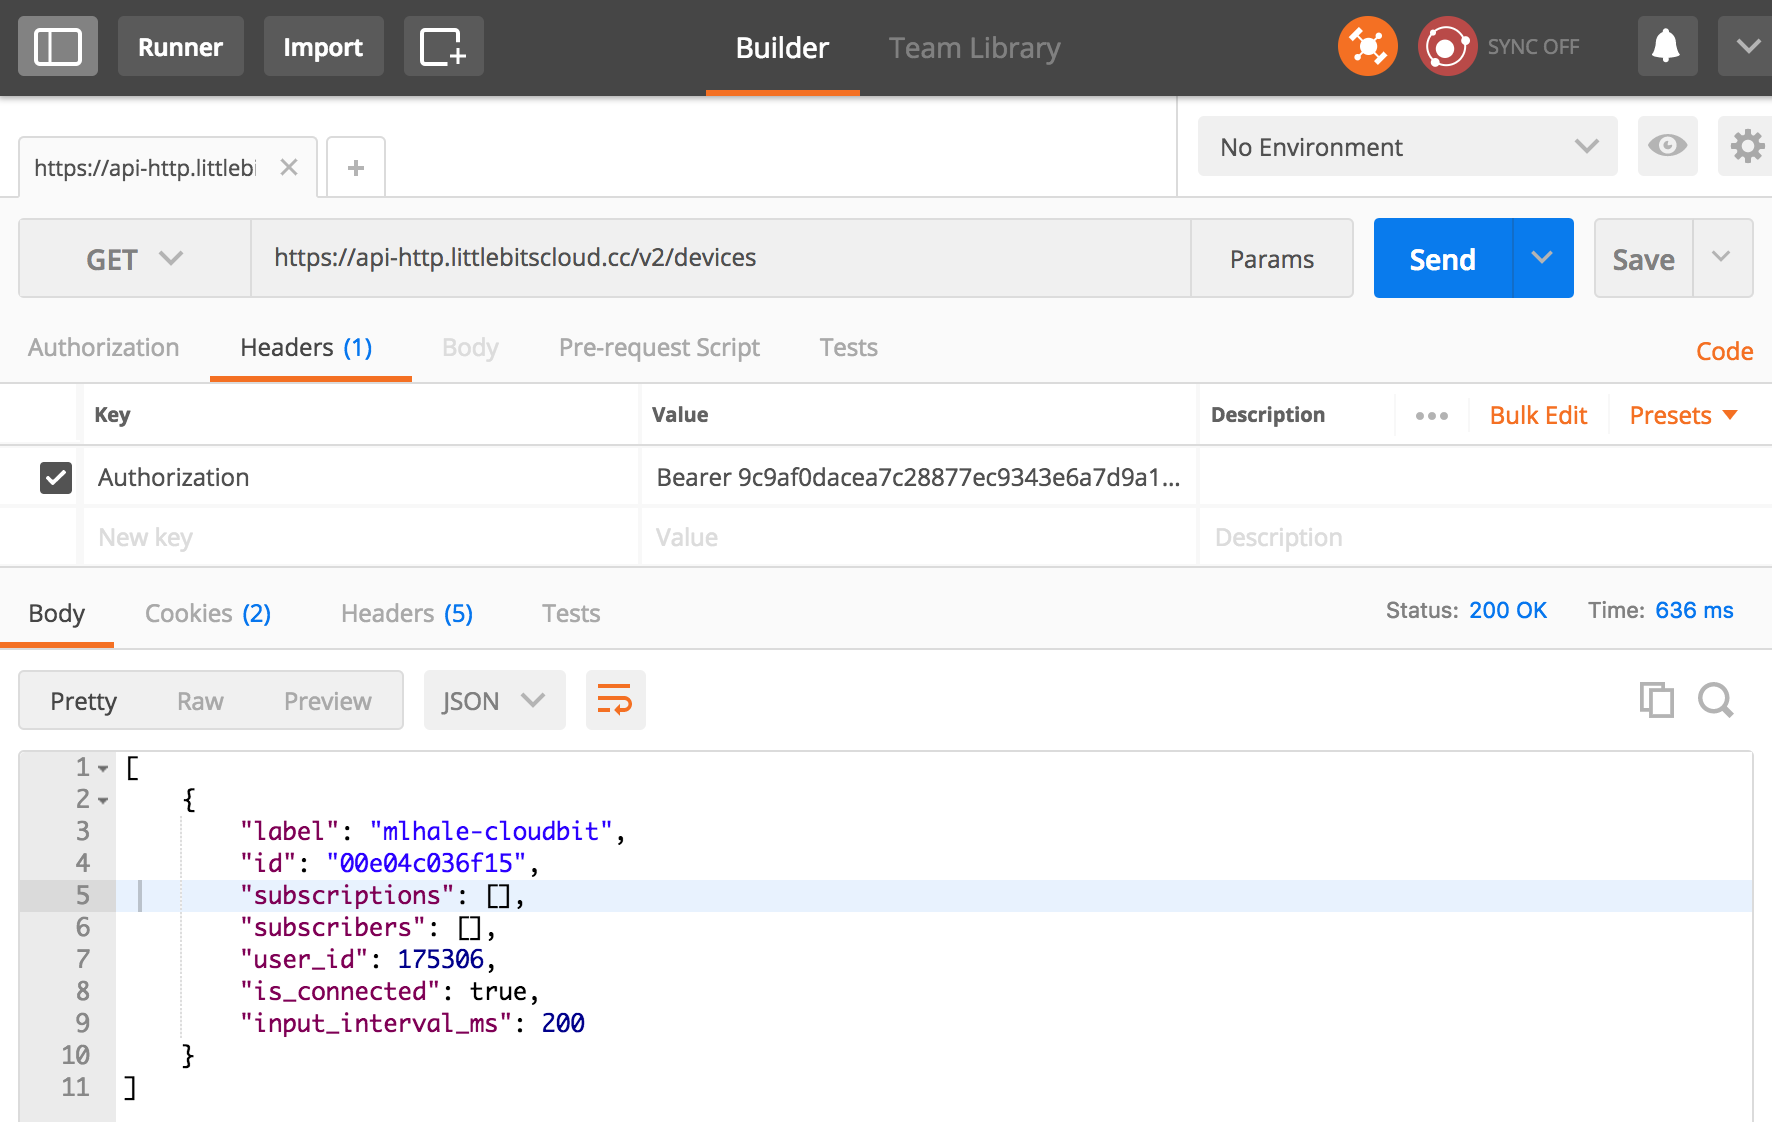
- The
responseyou got back, when you sent the GET request contains the name and meta information for each of thecloudbitscurrently connected to your account. In the screenshot above, the JSON data returned for me was:
[
    {
        "label": "mlhale-cloudbit",
        "id": "00e04c036f15",
        "subscriptions": [],
        "subscribers": [],
        "user_id": 175306,
        "is_connected": true,
        "input_interval_ms": 200
    }
]
This tells me the label of my cloudbit is mlhale-cloudbit and that it currently doesn’t have any subscribers or subscriptions.
Step 5: GET device info
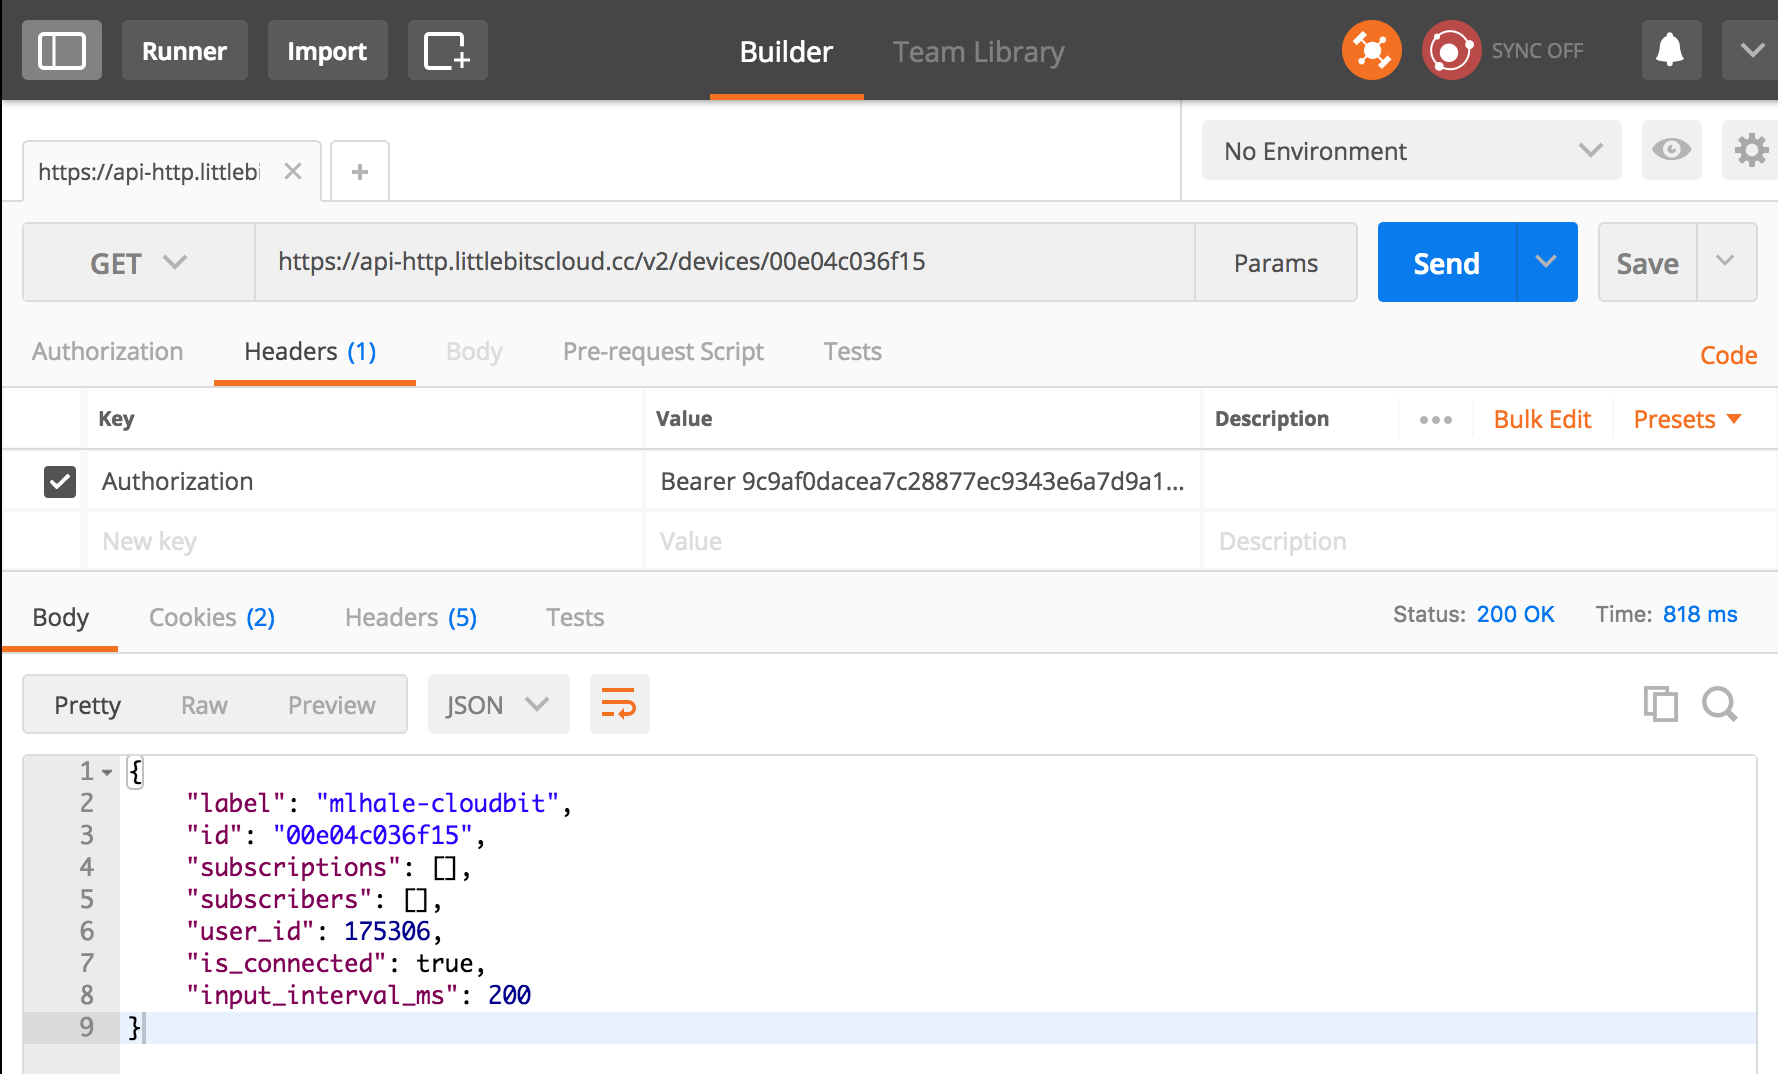
Now that we know our device id, we can use it to make a specific request for our device.
- make a new
GETrequest in POSTMAN to
https://api-http.littlebitscloud.cc/v2/devices/<your-device-id>
2018 note, for today’s lesson you will use the cloudbit I have setup for you
https://api-http.littlebitscloud.cc/v2/devices/243c201ece7c
- e.g.
https://api-http.littlebitscloud.cc/v2/devices/00e04c036f15in my example
You should get the same device info back, but notice that it is now not in square brackets - this means it is a singleton instead of a list.
 .
.
Step 6: First POST request to turn the device on
Now that we have the basics of GET requests to access device info, lets try issuing a POST request to actually make our device do something.
- Make sure you arrange your Littlebits as shown in the following picture:
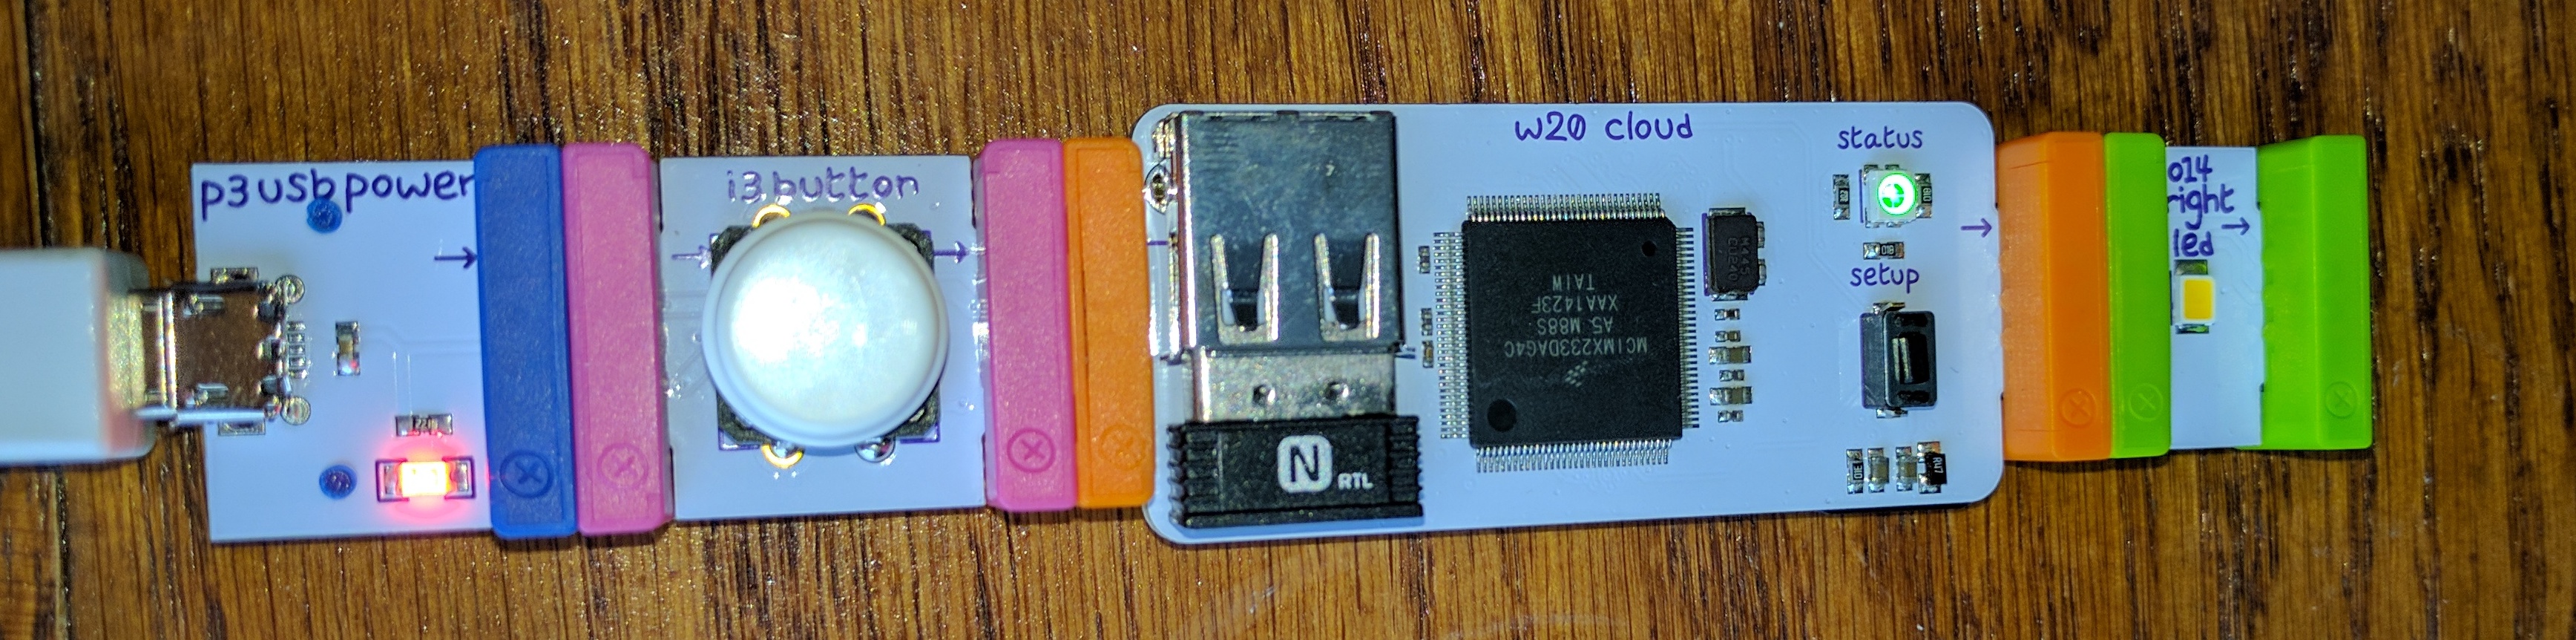
2018 note, for today’s lesson the cloudbit configuration is on the south east corner wall
- make a POST request using POSTMAN to set the voltage output on the cloudbit for a few seconds
https://api-http.littlebitscloud.cc/v2/devices/<your-device-id>/output
2018 note, for today’s lesson you will use the cloudbit I have setup for you
https://api-http.littlebitscloud.cc/v2/devices/243c201ece7c/output
- e.g.
https://api-http.littlebitscloud.cc/v2/devices/00e04c036f15/outputin my example
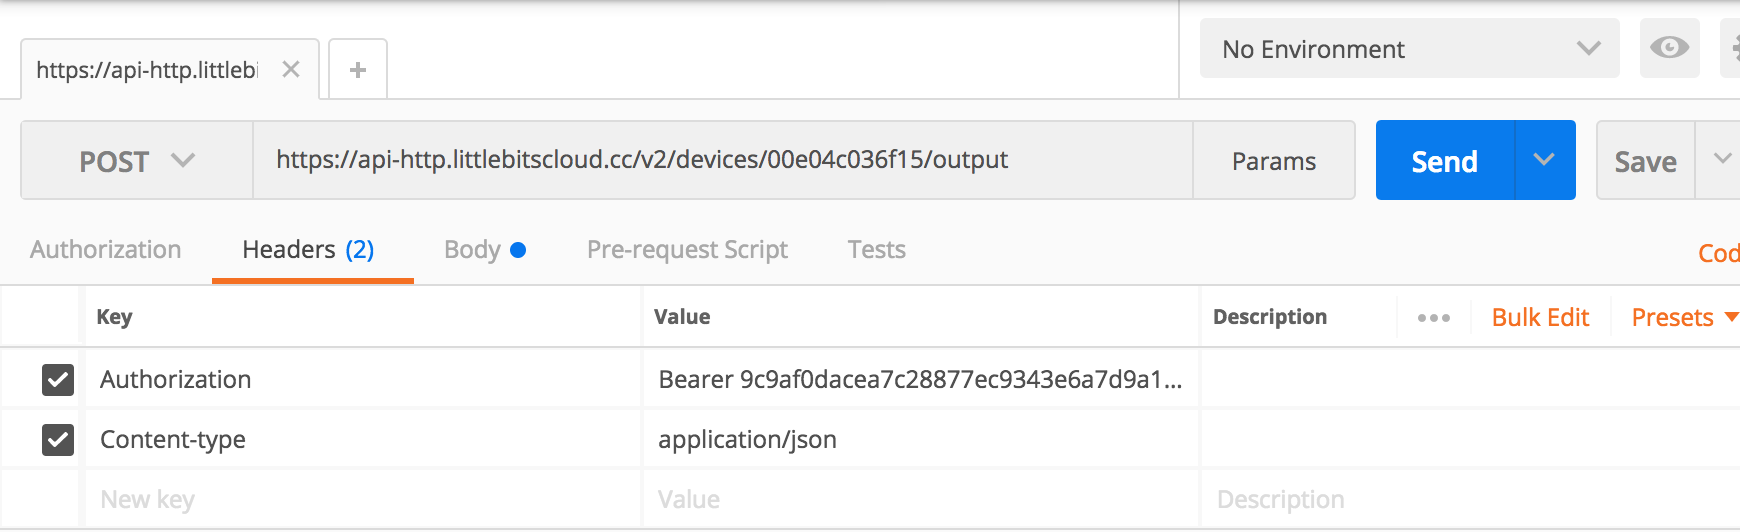
Before you issue the request make sure the headers are set as follows:
Headers:
Authorization: Bearer <your access token>
Content-type: application/json
2018 note, use the following header parameters
Authorization: Bearer 3111600dc0d5bd1f6cd25d39ed11302e182a23dff77d77cc8d79ab6def76fc60
Content-type: application/json
Now click on the Body tab (next to the Headers tab). Select the Raw input option and type the JSON shown below to tell cloudbit to turn its output to 100% and to stay on for 5 seconds.
Body:
{
    "percent": 100,
    "duration_ms": 5000
}
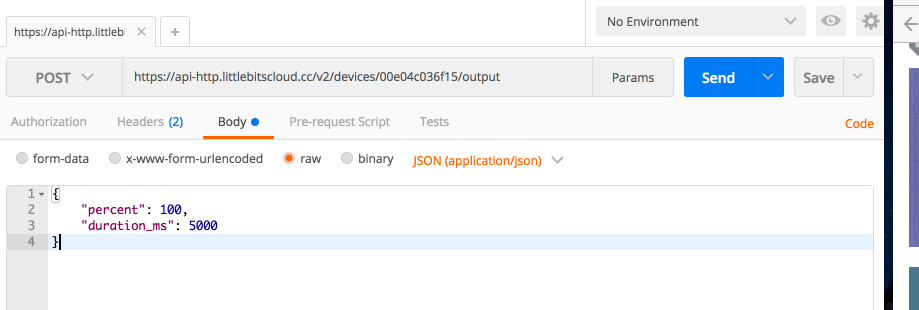
Now send the request You should get back:
{
    "success": true
}
and you should see your the cloudbit light up. You just used REST!
Exercise
Assume the cloudbit is now hooked up to the droid inventor kit from previous lessons. Assume the following code is written in scratch:

Also assume the droidkit is wired up as the output of our cloudbit.
Trigger each of the conditions by making POST requests to the littlebits API.
Checkpoint
Lets review what we’ve learned.
Additional Resources
For more information, investigate the following.
- https://developer.mozilla.org/en-US/docs/Web/HTTP/Overview - Overview of basic HTTP operations
- https://developer.mozilla.org/en-US/docs/Web/HTTP/Messages - Overview of request and response messages in HTTP
- http://developers.littlebitscloud.cc/ - API reference for the Littlebits web service.
Lead Author
- Matt Hale
Acknowledgements
Special thanks to Dr. Robin Gandhi, Andrew Li, and April Guerin for reviewing and editing this module.
License
Nebraska GenCyber 
is licensed under a Creative Commons Attribution-NonCommercial-ShareAlike 4.0 International License.
Overall content: Copyright (C) 2017-2018 Dr. Matthew L. Hale, Dr. Robin Gandhi, Dr. Briana B. Morrison, and Doug Rausch.
Lesson content: Copyright (C) Dr. Matthew Hale 2017-2018.
This lesson is licensed by the author under a Creative Commons Attribution-NonCommercial-ShareAlike 4.0 International License.